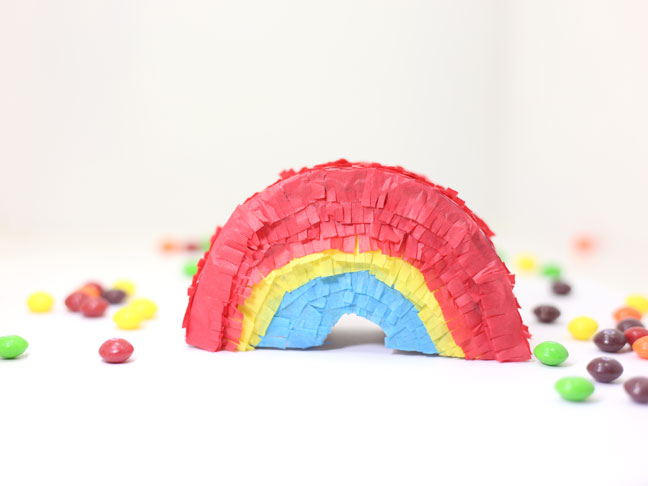
Mini piñatas make the best party favors. Especially when they’re shaped like rainbows and filled with Skittles! These mini rainbow piñatas would be great for Cinco De Mayo, a St. Paddy’s Day party, or any party, really.
Did I mention they’re made out of cereal boxes? Piñatas are hands down my favorite way to recycle!
Supplies:
- Printed template (below)
- Pen
- Scissors
- 1 cereal box (makes 2 mini piñatas—use more as needed)
- Ruler
- Tape
- Crepe paper (at least three colors)
- Glue (I used hot glue, but pretty much any kind will work.)
- Skittles (or other small candies)
Instructions:
Step 1: Save the template below (control click on a Mac, right click on a PC).

Step 2: Print the template and carefully cut it out along the outside edges.

Step 3: Cut a cereal box in half, so you have two flat sides.
Step 4: Place the template on the inside side of the cereal box and trace around the edges with a pen. Repeat for the other side of the piñata.

Step 5: Carefully cut out the cardboard arches along the outlines you made.

Step 6: Cut an 8″ by 1 1/2″ strip from the side of the cereal box.

Step 7: Place a long strip of tape along the top edge of one of the cardboard arches, pressing half of it down along the back of the arch and leaving half of it sticking out, as pictured below.

Step 8: Curve the cardboard strip along the outer edge of the arch and press the tape down to secure it in place. Trim the bottom edges, if needed. (They should be flush with the arch.)
Step 9: Place a long strip of tape along the outside edge of the cardboard strip, pressing half of it down along the back of the arch and leaving half of it sticking out, as pictured below.

Step 10: Insert the second cardboard arch and press the tape down to secure it in place. 
Step 11: Cut a 6″ x 1 1/2″ strip from the cereal box. Measure 2″ in on each side and mark with a pen, then measure 1/2″ from there on each side and mark. Bend the cardboard at the marks you’ve made, as pictured below. This will be the bottom of the piñata.

Step 12: Use an X-Acto knife or paring knife to make a trap door by making three slits on one side of the bottom strip. Bend the piece inside down to mark the fourth side of the square and bend back into place flush with the rest of the cardboard.

Step 13: Fill the piñata about halfway with Skittles (or other small candies).

Step 14: Place the bottom strip of the piñata over the open area and place strips of tape around the edges. Press the tape down to attach the pieces together. Reinforce with additional pieces of tape.

Step 15: Cut 1/4″ strips from the folds of crepe paper.

Step 16: Cut about 3/4 of the way into the strips of crepe paper, repeating along each strip to create fringe.

Step 17: Squeeze lines of glue onto the piñata shape and arrange the fringe paper on top, pressing to secure. Repeat until piñata is fully covered.

More Rainbow DIYs: