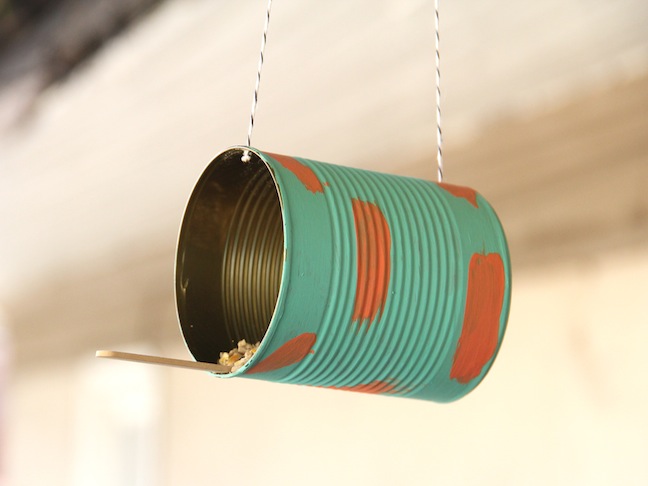
Materials:
- tin can
- paint
- paint brush
- awl
- string
- hot glue (or other strong glue)
- popsicle sticks
- bird seed
- scissors
- newspaper or paper towels (to protect your surface)


Instructions:
Step 1: Put down your newspaper or paper towels to cover your surface. Set up the paints, the paint brush and the tin can, and let your little one go to town painting!

Step 2: If your child is painting in more than one color or using more than one coat of any color, make sure you wait for the first coat (or color) dries completely before painting a second coat or color. Otherwise, the first coat/color may come off, and we don’t want that!

Step 3: Once the painting is done and dry, poke through your can with an awl to create two holes. Lie the can on its side, and poke one hole on the cylinder side toward the lid and poke the second hole on the other side of the can toward the bottom. These holes should be in line with one another so they are on the same latitudnal line, as pictured below:

Step 4: Cut a long length of string (better to have too much than too little!) and pull it through your first hole. Double knot (or triple knot if needed) the end of the string so it doesn’t come through the hole. Repeat the same step with the other hole. Take the two string ends from the holes and tie them together. This is how you will hang your bird feeder, so make it an appropriate length for hanging.

Step 5: Heat up your hot glue gun and glue the popsicle stick into the tin can, making sure enough of the stick is coming out of the can so birds can perch on it to eat.

Step 6: Once the hot glue is completely dry, fill the feeder with bird food.

Step 7: Hang the bird feeder outside! Have fun!


Want more spring crafts?
- Paper Flower Bouquet DIY Craft
- DIY Recycling Bin
- Wheat Grass Eggs
- Top 5 Spring Flower Crafts for Kids
- Recycled Vase DIY Craft
- Dry Rose Petals DIY
Find more craft from Kersey Campbell at ARDOR.