Busy boards are exactly what the name implies: boards that keep kids busy! When I was a new mom, I learned that I could get creative with the toys my kids played with, and they didn’t have to be expensive, or found in a toy store. I discovered busy boards after a trip to the hardware store, and I was amazed by how long my kids would play with it during their toddler years.
My children (ages 5, 7 and 9) are too old for toddler busy boards; however, when I made this DIY busy board they were drawn to it like magnets. My sweet nephew, Leo, is the happy recipient of this board. It gave me such joy to give him something to play with, and my sister gets a little break (he’s always attached to her hip!).
Here’s how I make my DIY busy board for toddlers; however, you will find inspiration everywhere, so make it your own.
Supplies:
- Wood board, 2 ft. x 3 ft., at least 1” thick, or round wood pine
- Paint
- Screwdriver
- Drill and drill bits
- Pencil
- Wood glue
- Letters (baby letter blocks, Banagrams, etc)
- Everbilt 3 ½ inch door hinge
- Defiant Chain Door Guard
- Everbilt 3 ½ Latch Post Safety Hasp
- Everbilt Light Duty Door Pull
- Everbilt Barrel Bolt
- Swivel Plate Caster Wheel
- Sheet Metal Screws (for the Caster Wheels)
- Wood blocks (or anything for the rainbow)
- Tap Light, like this
Instructions:


Step 1: Set the hardware on the board where you want it to be. With a pencil, mark the holes where you need to drill to screw the hardware in place.

Step 2: Once you make your marks, begin to drill holes halfway through the wood. Basically, you are starting the hole with the drill, and then hammering the hardware all the way through at a later point. Make sure your drill bit is the right size – it needs to make a hole slightly smaller than the screws.


Step 3: Paint the wood board. If you want the raw wood look, you can skip this step. I made this for my adorable nephew, and my sister is not one for bright colors. Black and white is her favorite color palette, so I painted it colors I knew she would like, knowing she is more likely to actually allow it in her house if it was visually appealing. At this time, I also painted the small wood blocks rainbow colors.


Step 4: Nail the hardware into the holes you pre-drilled. I used screws for all hardware, hammered small nails to hold the zipper, velcro to for the light (battery operated), and wood glue for the rainbow blocks.


Step 5: Add a name on top. I had baby blocks around the house, so I used them, but you can add any letters you find.


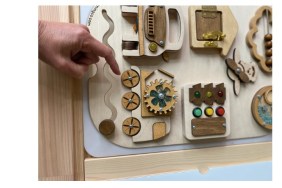
Step 6: Let your child play, discover and learn. This board is good for counting (drawer handle with washers), learning the colors of the rainbow, practicing fine motor skills to open and close locks, moving the zipper up and down, rolling the big and little wheels, and Leo’s favorite, pushing the light on and off.
Next time you make a trip to the hardware store, think about all the ways it can not only keep you or your husband busy with household projects, but a toddler, too!
Like what you see? Don’t forget to Pin it!