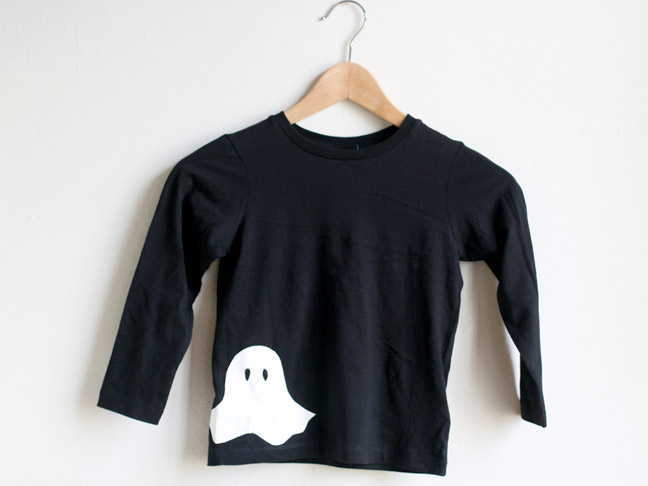
Add a little spook to your child’s wardrobe this Halloween. If you don’t have a Halloween costume, this Stenciled Ghost T-Shirt makes a great last-minute cotume option. Make this cool craft today!
Supplies:
- black t-shirt
- freezer paper (find this at the grocery store next to waxed paper)
- white opaque fabric paint
- foam brush
- iron
- exacto knife
- Print-out of this Ghost PDF
- paper towels
- masking tape
- mat board

Instructions:
Step 1: Tape the print-out onto a piece of freezer paper.

Step 2: On a mat cutting board, carefully cut out the outline of the ghost shape with your exacto knife through both pieces of paper.

Step 3: After the outline is cut out, cut out the eyes and set those aside. FYI: These separate eyes technically don’t make it a stencil but they’re easy enough to iron on separately.

Step 4: Toss the printer paper but keep the freeze paper ghost.

Step 5: Place the freezer paper stencil where you’d like it on your t-shirt, shiny side down. Iron it on using circular motions. Make certain it’s completely adhered to the shirt.

Step 6: Take the small eyes you cut out and iron those on to the spot you’d like inside the ghost.

Step 7: Place paper towels or napkins underneath the top layer of the t-shirt to prevent paint from bleeding through.

Step 8: Using your foam brush, apply white fabric paint to the inside of the stencil.

Step 9: You’ll need to do a couple of coats at least, depending on the opaqueness of your paint. In between coats you can apply a cool blow dryer to speed up drying. Each layer should dry to the touch in about 5 minutes.

Step 10: Once you’re satisfied with the result and the paint is dry, you can tear off the freezer paper, including the eyes.

BOO! You’re done!

Want more Halloween crafts?
- 10 Crafts to do with Kids
- Spooky Monogram DIY Craft
- Scratch-Off Pumpkins DIY Craft
- 10 No-Sew Halloween Costumes for Kids
- Rock Ghosts DIY Craft
- DIY Witch Hat
- Orange Pumpkin Decor DIY Craft
- Halloween Luminaries DIY Craft
- Chalkboard Pumpkins DIY Craft
- Candy Cornballs DIY Craft
- Jack-Be-Little Spider and Bat DIY Craft