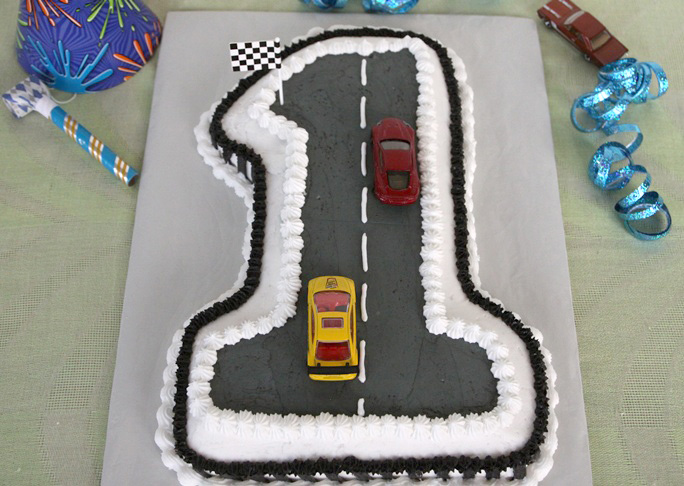
Your guests will be charmed by this Race Track First Birthday Cake. Just make sure you use cars without small pieces, and remove the cars before serving, as these are a choking hazard.
Keep up the race car theme by using use black and white plates, napkins, or cups to represent the checkered flag.
Ingredients:
- 1 box cake mix (and accompanying ingredients needed to make the cake batter)
- no-stick cooking spray with flour
- Wilton Number 1 Cake Pan
- 3 cups white decorator icing
- black food coloring
- Wilton #32 star tip
- Wilton #18 star tip
- Wilton #5 round piping tip
- Wilton #47 tip
- 4 Pastry bags
- 12 x 16 inch cake board (or cardboard sheet)
- decorative foil wrap
- small piece of wax paper
- small checkered flag (optional)
- small race cars (warning: remove before eating as these are a choking harzard)
Preparation:
Step 1: Preheat the oven and mix up the cake batter according to the package directions.


Step 2: Spray the Wilton Number 1 Cake Pan with flour-added no-stick cooking spray. Pour the cake batter in the pan and bake according to package directions.

Step 3: Once the cake is baked, turn it out onto a cooling rack to cool completely.
Step 4: When the cake has cooled, level the top with a serrated knife.
Step 5: Cover your rectangular cake board with decorative foil.
Step 6: Put a little icing on the cake board, where you plan to place the cake; this will act as a glue to secure the cake in place. Place the cake on the cake board over the icing, cut-side down.


Step 7: Ice the outside of the cake with white icing. Give the icing a few minutes to dry and go over it again with a second layer of white icing. Be sure to leave the very center of the 1 cake (where it’s raised) un-iced.

Step 8: Let the icing sit for a few minutes to dry. Once dry, smooth the icing with the piece of wax paper.
Step 9: Measure out two cups of white decorator icing and color it gray by adding a few drops of black food coloring and mixing it thoroughly. Add the food coloring gradually until the icing reaches the desired color. Be sure to reserve at least ½ cup of white icing (this will later be used for for a white scalloped border, and the line down the center of the road).
Step 10: Ice the center of the cake (where it’s raised) with two layers of gray icing, being sure to allow the first layer of icing a few minutes to dry before applying the second layer.
Step 11: Let the icing sit for a few minutes so the surface starts to dry, and then smooth the icing with a small piece of wax paper.

Step 12: Color the rest of the gray icing with more black food coloring, until the icing is black.
Step 13: Fill a pastry bag with black icing and attach the Wilton #47 tip to it.
Step 14: Use the Wilton #47 tip with the smooth side up to make black stripes down the side of the cake. Leave a space as wide as the tip between each stripe.

Step 15: Fill a pastry bag with white icing and attach the Wilton #32 star tip. Use the tip to make a scalloped border around the base of the cake. To do this, hold the tip against the base of the cake, squeeze the bag slightly and pull forward as you release the pressure. Put the tip over the end of the last scallop and repeat the process all the way around the base of the cake.

Step 16: Use the same Wilton #32 star tip to make a star border all the way around the 1 race track (between the gray and white icing). Hold the tip straight out from the cake, squeeze the pastry bag gently and lift as you release to create the stars.

Step 17: Place a Wilton #18 star tip on the pastry bag with the black icing (or fill another bag with black icing). Use the smaller star tip to make a row of stars all the way around the top outside edge of the cake.

Step 18: Add the to the end of the pastry bag with white icing (or fill another bag with white icing). Use the piping tip to make a center dashed line down the middle of the race track.

Step 19: Add a checkered flag, and some model cars to your race track.

Want more birthday cake ideas?
- Rainbow Cake Recipe
- Rainbow Layered Cake Recipe
- Princess Cake Recipe
- Good Witch Mini Cakes Recipe
- Banana Fluffernutter Cupcakes
Find more from Linette Gerlach at The Kid’s Fun Review.