
We’re doing our best to stop using disposable paper and plastic bags. But while I was busy purging my house of disposable bags, the mountain of reusable bags that we’ve accumulated gets bigger and bigger…and I feel 100% more guilty throwing those things out. It seems like almost every clothing store gives away branded reusable bags these days. I just don’t know how to keep up with them.
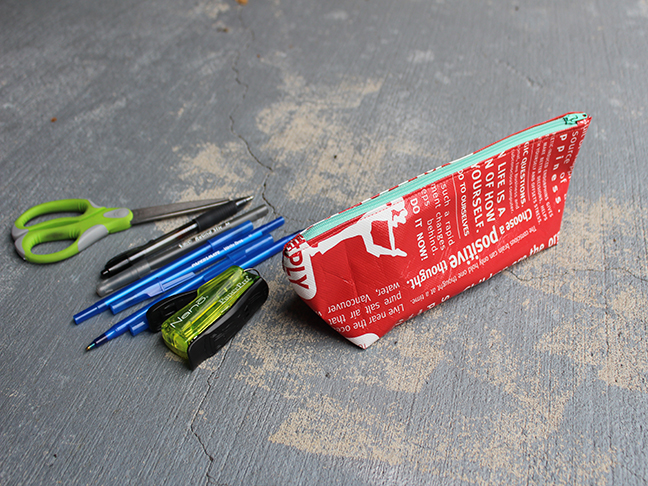
Enough was enough: I decided to take an afternoon off and re-purpose a few reusable bags into zipper pouches. I went through my bag stash and found all the bags with fun prints and words on them. Lululemon has great bags with inspiring saying on them so I repurposed those first. I loved how they turned out. These handy little pouches make perfect pencil cases, travel makeup bags, and a nice way to stash my cords and headphones in my gym bag.
Here’s how to make your own zipper pouch bags.

RELATED: 26 Brilliant Mod Podge Ideas
Supplies:
- 1 large reusable shopping bag
- 14″ zipper
- sewing machine and zipper foot
- sewing supplies—pins and thread
- paper scissors
- pen and ruler

Instructions:
Step 1: Cut out one side of the shopping bag. Lay the piece of fabric flat onto your working surface. With a ruler and pen, draw two rectangles measuring 12″ x 6″ and another two rectangles measuring 3″ x 2″. Cut out the rectangles.

Step 2: Place the large rectangles facing right-side down. At the top edge, mark a line inward ½” (this is the seam allowance), repeat again, and mark another line inward ¼” (this is the zipper placement). Repeat for all sides on the large rectangle.

Step 3: Place the zipper along the top edge. Cut the zipper down to size. The zipper final length should be 10½”.

Step 4: Place the large rectangles to the side and focus on the small rectangles. Along the long side, turn and fold each side inward ½”. Repeat and fold in half. Repeat for both. These are the zipper tabs.

Step 5: Place each folded rectangle over the zipper end. Pin. Place into sewing machine and stitch down. Backstitch. Repeat for other side.

Step 6: Trim off extra fabric.

Step 7: Now it’s time to sew the pouch together. Place the large rectangles back onto your working surface. With the fabric facing right-side down, turn and fold each top edge ½”.

Step 8: Turn the fabric to face right-side up. Place zipper along the top edge. The zipper should end ¾” inward from each side. Pin. Change to a zipper foot on your machine. Place into your sewing machine and stitch with the zipper down. Repeat for the other side.


Step 9: Fold along the top edge at the zipper. Match side seams and pin. Place into your sewing machine and stitch the side seams and the bottom edge with a ½” seam allowance. Leave a 3″ opening at the bottom edge. Backstitch.

Step 10: Turn and wiggle your pouch around to have the side seams facing upward. The side seams should lay on top AND match the bottom seam. There should also be a 45-degree angle along the side. This step is very important and helps make the bottom of your pouch square. Measure in from the tip and mark a line at 1½”. Pin. Place into your sewing machine and stitch following the line. Backstitch. Repeat for the other side.

Step 11: Cut off each tip, leaving a ½” seam allowance.

Step 12: Turn your pouch right-side out. Wiggle the corners into place

Step 13: Fold under seam allowance at the bottom opening. Place your pouch into your sewing machine and topstitch the pouch closed.

That’s it! Fun and easy, right? Want to know what’s even better? The fabric doesn’t fray, so you don’t need to line the pouch. What a great way to re-purpose all those bags that are gathering dust under your kitchen sink.


More DIY Crafts for Moms: