
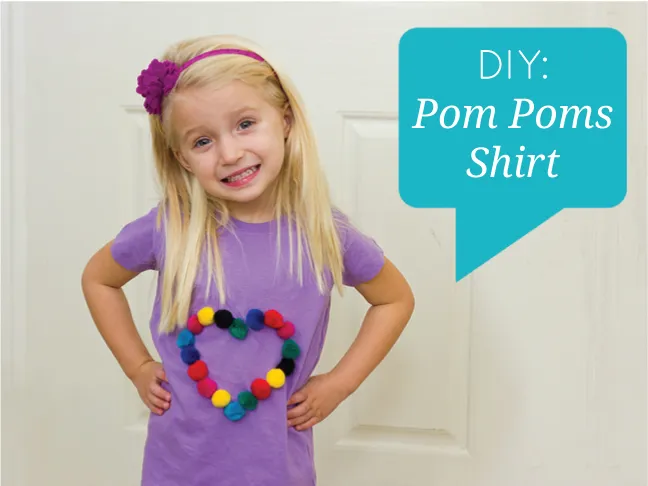
As a kid, my favorite craft items were pom poms. They were fuzzy and fun to hold in your hand or glue on practically anything! My daughter now holds that same fascination with them, so I thought that I’d make her a t-shirt that would celebrate that love and also let her pet those fuzzy little pom poms all day long! This is a quick DIY pom poms craft to whip up on a weekend, and the end result will be wearable fun for the next day!
Supplies
- Child’s t-shirt
- 1″ pom poms
- Thread
- Sewing needle
- Double-stick tape
- Fabric glue (i.e. Fabri-Tac)
- Heart Template (find the template here and save it to your desktop, then print!) – or any design you’d like!

Instructions:
Step 1: Place double-stick tape along the edges of the back of your paper template. The more tape the better the hold, so don’t hold back! Align the template as you’d like it on the shirt and press it securely!

Step 2: Secure a starter knot in your needle and thread, and then sew your first stitch up through the t-shirt and template at the base of the heart. Pull the thread all the way through until the knot is secure inside the shirt.

Step 3: Select your first pom pom and push the needle/thread through the center of the ball. You should feel a bit of resistance, and that’s a good thing! Push the pom pom along the thread towards the shirt until there’s only a 1/2-inch of thread between the pom pom and the t-shirt. Then, push the needle in the opposite direction down toward the t-shirt, and through the center of the pom pom again. Then finish the stich by going through the t-shirt. Pull the thread tight to secure the pom pom as tightly to the shirt as you can. Start your next stich in the middle of the next line of the template, and repeat until all of your pom poms are attached!

Step 4: When you attach your final pom pom, you’ll want to return to the original one and repeat the sewing process one more time just to secure everything. When that’s finished, knot off your thread on the underside of the t-shirt. Then, use your fabric glue to lightly coat the knot for extra security.

Step 5: Check all your pom poms for thread security, and see if there are any you’d like to sew down some more. If not, you’re almost done!

Step 6: Remove your template by tearing the paper around your design. Be gentle so that your stitches aren’t affected, but know that that all the paper will come out easily!

Step 7: Time to secure everything with a little more glue! Roll each pom pom to its side, then add a small dab of fabric glue under it. Then roll it back and press down. The glue should dry quickly and you’ll have a wearable t-shirt ready to go!

Your kids will adore the fuzziness of the shirt and the design!

Hints:
- Take care if you want to machine wash your shirt. Put the shirt inside out, place it in a pillow case and use your delicate cycles to preserve it through multiple washings. Definitely line dry it!
- Involve your child in the sewing process by having them select the color order of the pom poms! It’s a lot more fun when you sew together!


