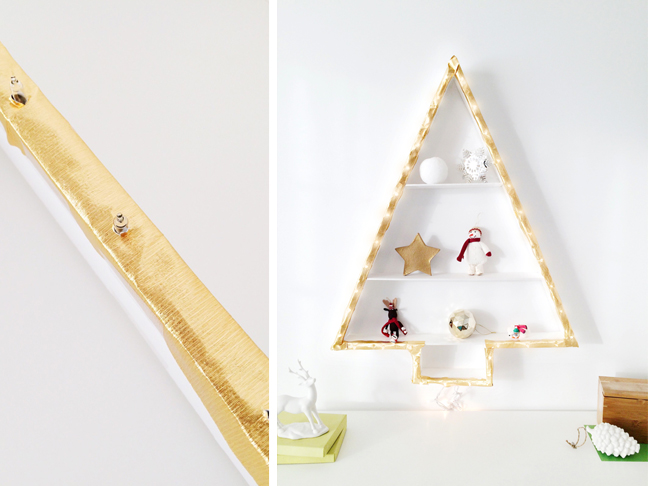

The twinkling icicle lights have been hung, the ornaments are draped perfectly, and I’m sitting by the fire. Seriously, right now. I’m sitting by the fire. It’s divine. It’s also a pretty clear indicator that it’s full-on holiday time. Every year, I try my hand at a new Christmas project or two. This year, I’m all about maximizing wall space, because my floor space is all spoken for. This DIY wall light Christmas tree is the ultimate space-saving, cost-cutting holiday decor.

It looks great during the day, all bright white and snowy, but it’s also a stunner at night. Forget tiny nightlights. The kids will dream of all things merry and bright as they snooze under the soft glow of these lights.
Supplies:
- 2 foam boards
- gold streamers
- white Christmas lights
- ruler
- pencil
- utility knife or heavy duty scissors
- shipping tape
- double-sided tape
- hot glue gun
Instructions:
Step 1: Measure, mark with pencil, and cut several 3″ wide foam core strips of foam board. You’ll need:
2 – 31″ strips for the sides of the tree
1 – 29″ strip for the bottom of the tree
2 – 4″ strip for the sides of the stump
1 – 8″ strip for the base of the stump
1 – 9.75″ strip for the first shelf
1 – 18″ strip for the second shelf
Step 2: Using shipping tape, create a triangle from two 31″ pieces and one 29″ piece. Secure at each corner of the triangle to create the body of the tree. Tape the corners of one 8″ and two 4″ pieces together to create the tree stump. This should look like a squared off “U” shape. Hot glue the stump into position at the base of the tree,
Step 3: Find the center of the strand of Christmas lights. One half of the strand will go along the outside of the right side of the tree, while the other half will run the length of the left side. Run lights along the outside of the triangular tree by placing a piece of clear shipping tape between each light bulb. Position each bulb so that the base is flush to the top edge of the tree.

Step 4: Align the 29″ foam board piece outside of one side of the tree to create a foam-lights-foam sandwich. Using shipping tape, tape the sandwich together at each corner. Repeat this process around the stump of the tree, leaving a small gap in the middle to allow the light strands to trail beneath the tree and eventually plug into the wall.
Step 5: Position the center (width-wise) of the gold streamers over the row of lights. Gently press the streamer down onto the lights, creating small holes down the center of the streamer. Use small pieces of double-sided tape to secure the streamer onto each side of the foam-lights-foam sandwich. Repeat around the entire perimeter of the tree.

Step 6: Measure the height of the various trinkets you want to display to determine the necessary height for your shelves, and cut 3″ wide pieces of foam board to the appropriate length to fit snugly within the body of the tree at that height. Adhere the shelves to the tree’s interior using hot glue. Set aside to dry.
Photos by Shauna Younge of Sweet Tooth for Momtastic
More Christmas Tree DIYs: