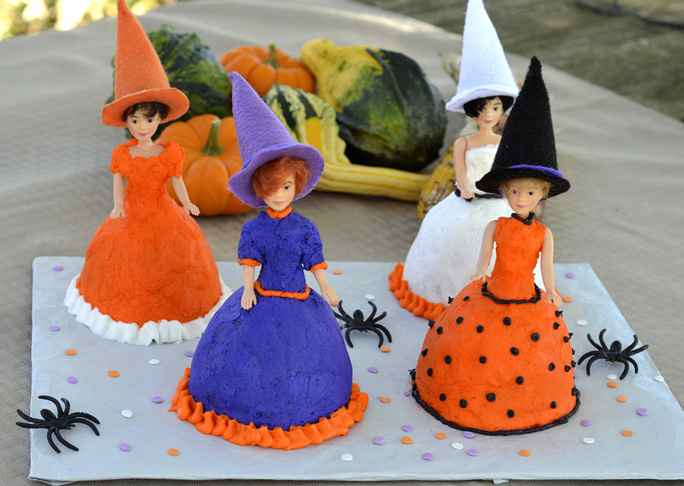
Not all Halloween snacks have to be scary—these Good Witch Mini-Cakes are more sweet than spooky. They’re impressive but not hard to make even if you don’t have much cake-decorating experience. So, turn on the charm this Halloween, and use your imagination to give each witch her own distinct personality.
Supplies:
- Wilton Mini Wonder Cake Pan (or another small, ball-shaped cake pan)
- 1 box cake mix (and accompanying ingredients required to make cake)
- 2 – 3 cups decorator icing
- assorted decorator tips
- pastry or plastic bags
- orange, purple, and black food coloring
- orange, purple, white, and black felt (1 piece in each color)
- glue
- Wilton Mini Doll Pic Set (4 to a pack)
- cake board (you can use a piece of cardboard or a cookie sheet)
- scissors
- tape
- foil
- yarn
- Witch Hat Pattern (print this out)
Instructions:
Step 1: Preheat the oven to 350.
Step 2: Mix up the cake batter according to the box or recipe directions. Spray the cake pan with flour cooking spray.
Step 3: Fill each cavity in the cake pan about 3/4 full of batter, you should get about 4 to 6 mini cakes from one cake mix.

Step 4: Bake the cakes according to the directions, (usually at about 350`F for about 20-22 minutes). When the timer goes off check the mini cakes to see if they’re done, by inserting a toothpick in the center. If comes out clean, they’re ready. Otherwise, bake them for an additional few minutes.
Step 5: Once the cakes are baked, let them cool for two minutes in the pan. Then, use a serrated knife to level the tops, then loosen the cakes gently and turn them out onto a cooling rack until they’re room temperature.

Step 6: While the cakes are cooling, wrap your cake board (or cardboard/cookie sheet) with decorator foil or aluminum foil. Tape the edges of the wrap to the bottom of the board.
Step 7: Divide your decorator icing, by reserving 1/4 cup and then dividing the remaining icing into thirds. Color the resered 1/4 cup with black food coloring, color 1/3 of the remaining icing with orange coloring; color 1/3 with purple, and leave 1/3 of the icing white.
Step 8: Print out the Witch Hat Pattern. Use your scissors to cut out the pieces.
Step 9: Using the Hat Top Pattern, cut a Hat Top from each piece of felt you so have an orange Hat Top, a purple Hat Top, a white Hat Top, and a black Hat Top. To do this, simply lay the pattern on top of the felt, trace the pattern and cut out your felt piece along the lines you traced.
Step 10: Do the same with the Hat Brim pattern, so you have an orange Hat Brim, a purple Hat Brim, a white Hat Brim, and a black Hat Brim. You’ll need to cut out the center circle as well.

Step 11: Glue the top of the hat together to make a cone shape by running a line of glue down the back straight edge seam of the hat. Then fold it into a cone shape by pulling the other edge over the glued edge to form the back seam. Hold the edges together with a straight pin or two until the and set them aside to dry.

Step 12: Arrange the cooled mini cakes on the covered cake board, with a dollop of icing underneath to hold them in place.

Step 13: Ice the mini cakes. Ice one cake white, one cake purple, and two cakes orange. While you’re done icing the cake insert the doll pieces into the top of the cake and ice the torsos of the dolls, so it look’s like the top part of the dolls dress.

Step 14: Let the iced cakes sit for several minutes so that the outside of the icing begins to dry. Then, use a square of parchment or wax paper to smooth out the icing, by pressing lightly with your fingers over the paper along the edge of the cakes. You can also use a paper towel to smooth some of the icing which will give it a little texture, or even leave some icing unsmoothed.

Step 15: Clean up the cake board with a damp rag.
Step 16: Use assorted tips to add ribbons, and lace, and trimmings to the witches dresses. Trim them with icing in contrasting colors. Small round, ribbon, and star shaped tips all work well for decorating the dresses. You can add polka dots, stars, little flowers, borders, ribbon, trim and more with the decorator tips. Use your imagination!

Step 17: The glue on your Witch Hats should be dry. Finish the hats by gluing the Hat Tops to the Hat Brims.

Step 18: Add a piece of black, purple, white, or orange yarn to the hat where the two pieces meet to hide the seam.

Step 19: Add the Witches Hat to the dolls and you’re ready to display your Good Witch Mini Cakes!

Want more Halloween Crafts and Recipes?
- Candy Cornball Craft
- 10 Halloween Kid Crafts
- Spider Brownies Recipe
- Marshmallow Rice Bar Ghosts Recipe
- Halloween Luminaries Craft
- Pumpkin Orange Decor Craft
See more DIY projects from Linnette Gerlach here.