As a mom, it’s inevitable you’re going to forget things. If you’re like me, though, you forget a lot of things, like the time I completely forgot to pick my son up from school. In my defense, it was Wednesday, his school’s early day. I didn’t win any “mom of the year” awards that day, but he did get home safe—eventually. Oops.
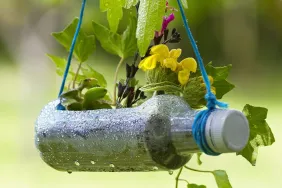
That’s why I LOVE this self watering planter. It’s okay if you forget to water the plant; it will water itself. Sigh—finally—one less thing to do. Yay!
So, how does this project work? The concept is simple: The string sucks the water up from the bottom portion of the planter to the top part. I made these a few years back, and my plants stayed happy for a long time. The plants were drought resistant, but they seemed really, really happy.
Here’s how you can make your own self watering planters.
RELATED: 31 Crafty Ways to Upcycle Wine Bottles

Supplies:
- 5 oz. cleaned water bottle (I prefer the kind that is smooth.)
- craft paint
- paintbrush
- yarn
- scissors
- nail
- hammer
- craft knife
- painter’s tape
- plant
- soil
Instructions:

Step 1: With your craft knife, cut off the top third of your plastic bottle.

Step 2: Even out your bottle’s edges with your scissors.

Step 3: Hammer your nail into the water bottle’s plastic top. Make a really wide hole by nailing the nail a few times into the top. This way you can easily thread your yarn through it.

Step 4: Wrap painter’s tape around one edge of the top of the water bottle.

Step 5: Paint the top part of your water bottle. You may need two or three coats. Let dry.

Step 6: Paint the cap. Let dry.

Step 7: Thread a one-foot piece of yarn through the bottle cap.

Step 8: Screw the caps back onto the water bottles.


Step 9: Pour water into the bottom half of the bottle. Put soil into the top of the water bottle and plant your plant. Then place the top portion of your bottle inside the bottom portion.