Materials:
- thick leather scraps (I found my leather at the local craft store for $2!)
- scissors
- hole punch
- pen
- craft glue
- yarn or embroidery floss
- needle
- cutting mat
- rotary cutter
Instructions:
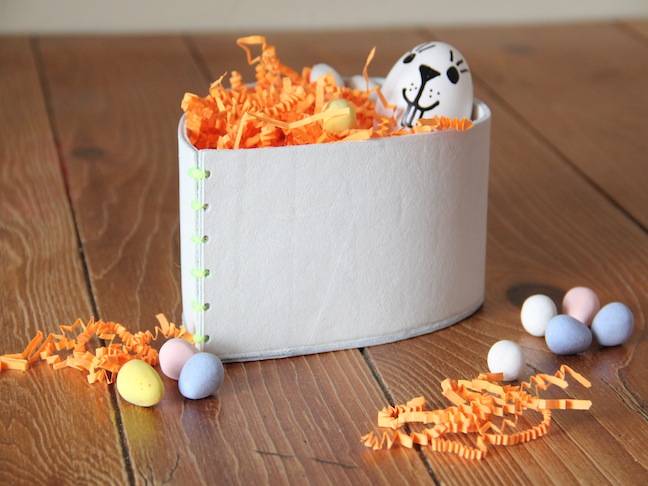
Step 1: Take your leather and cut it to size using the cutting mat and the rotary blade. You can customize the size of your basket to suit your needs, but I cut my leather to a rectangle sized 4 inches x 20 inches.


Step 2: Using a ruler or your cutting mat, plan out how to space your holes on the edge of the leather and mark with a pen. I spaced my holes a ½ inch apart. Punch the holes with your hole punch.

Step 3: Lace the yarn or embroidery floss through the holes. After each stitch, pull the yarn taught to secure. Once you have laced through all the holes, knot it off and snip the end.

Step 4: Make the bottom of the basket. To do this, lay the second piece of leather flat on your surface. Place the stitched together cylinder of leather atop the flat leather piece and trace the outline of the leather cylinder onto the flat piece of leather using your pen to create an outline of the bottom. Cut out the shape you traced.

Step 5: You can secure the bottom on you can do one of two things:
- 1. Punch more holes and stitch the bottom on
- 2. Go the craft glue route (like I did). Run craft glue all around the rim of the cylinder and position the bottom piece on.

- 2A. Press gently along the edges of the new bottom to help secure it. Mine dried in a few minutes and was easy to wipe off any excess glue that seeped out.

You’re finished! Fill your new basket with pretty eggs and grass and enjoy!

Want more Easter DIYs?
- Moss Easter Basket DIY
- Easter Bunny Mask DIY Craft
- Spring Bunny Wreath DIY
- Easter Fabric Trays DIY
- Easter Recycled Can Vase
- Wheat Grass Eggs DIY
Find more creative DIY ideas from Kersey Campbell at ARDOR