The ease of this project makes it perfect for those tweens to make in abundance on a rainy afternoon.

MATERIALS
- Green felt squares
- Embroidery floss and needle
- Scissors
- Snap barrette
- Free Shamrock Pattern
INSTRUCTIONS

Print out the FREE PATTERN, making sure your printer settings are scaled at “none”. Cut out the printable

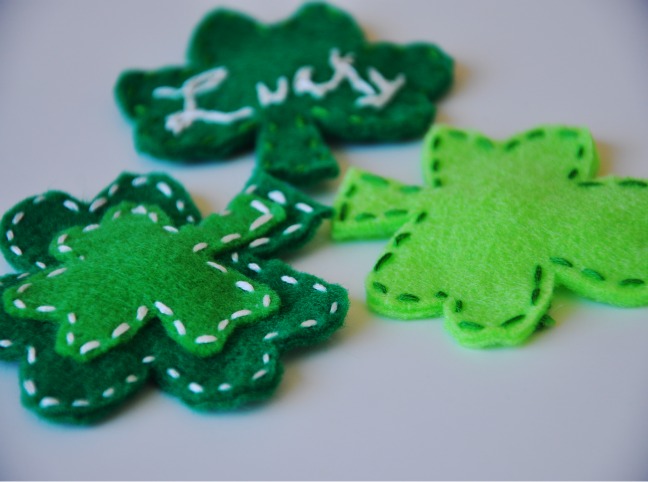
Fold your felt and place the dashed side of the pattern on the fold. Pin in place and cut out. Place your cut shamrock and place it on the felt and cut out another shamrock to match.

Now you have 2!

Position your snap barrette over one of the shamrocks, making sure there is equal amounts of room on the sides. Make a mark with a pen right where the back part of the middle piece will be. Make a very small slit with your scissors. Insert the clip. Set this piece aside for now


For this particular barrette, I made a smaller shamrock in a lighter green to go on top. To do this, Cut the pattern down a little. I cut about 1/5″ off. Cut out the smaller shamrock

Thread your needle with embroidery floss.

Place the smaller shamrock on top of the other larger shamrock

Beginnig from the bottom, start making small straight stitches around the outer edges of the smaller sharock, securing it to the larger one. Stitch around the entire edge. Finish with a stitch towards the bottom and make a few knots to secure. Apply a bit of fabri-tac if desired.

Place the top piece over the piece with the snap clip on it and repeat the hand stitching process. Stitch small, straight stitches around the entire large shamrock, encasing the barrette inside. Knot at the back to secure.

You’re done! You can make them simple, or embellish them with embroidery. I think even a few sequins would be great.

Make some more and hand them out to your friends or classmates!