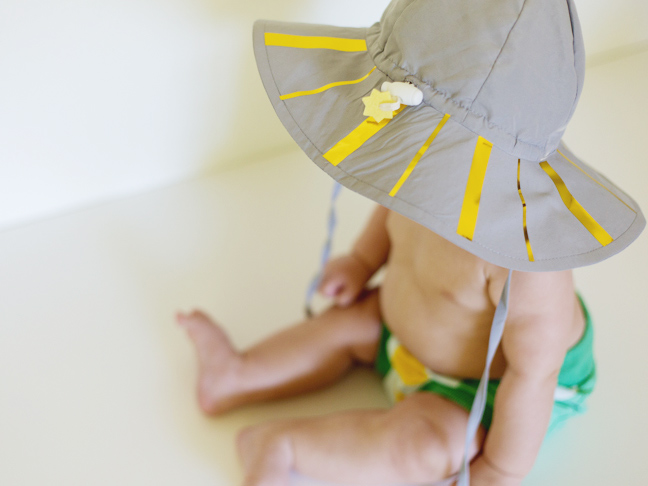

I confess: I hate baby sun hats. The majority of the sun hats that I have tried on my kiddo have either fit poorly, fallen off, not given enough sun protection, or have been just plain unattractive. I know, I know! That superficial thought shouldn’t even cross my mind when it comes to protecting my little dude from the sun, but it does. So I took matters into my own hands and found a plain old sunhat with great protection, and jazzed it up with a little golden touch. It was super simple and only took about fifteen minutes—here’s how you DIY a baby sun hat, too!


Supplies:
- plain baby sun hat
- gold iron-on foil
- scissors or rotary cutter
- cutting mat
- nonstick pressing sheet
- iron
Instructions:
Step 1: Decide on the design you’d like on your hat. You can do anything from a pattern to an image to your kiddo’s monogram or name if you like! I went with some simple stripes to mimic the look of sunshine.

Step 2: Cut out your pieces from the iron-on foil. Keep in mind that if you’re doing words or an image you’ll need to cut them out in a mirror image so that they iron on correctly. If you’re doing stripes, a rotary cutter and a cutting mat will make it nice and easy.

Step 3: Arrange your design in or around your hat to plan where you’ll iron.

Step 4: Lay your first piece of gold down on the brim of the hat, gold side up. Place the pressing sheet over the top.

Step 5: With a hot iron, press down firmly for about twenty seconds, moving the iron around a bit to evenly distribute the heat.

Step 6: Remove the iron and the pressing sheet. Allow the area to cool. Carefully peel away the clear cover over the gold foil.

Step 7: Continue in the same manner to iron on the rest of your pieces! When you’re done, give the hat a wash and take your little one out for some summer fun!


More Sun Hats: