Materials:
- sheets or scraps of dark pink, pink, light pink, and purple card stock (or choose other colors: simply select 4 coordinating colors you like)
- 10 x 7 inch piece of card stock in a light color
- 3 inch heart-shaped cookie cutter (or template)
- 2 inch heart-shaped cookie cutter (or template)
- 1 ½ inch heart-shaped coookie cutter (or template)
- ½ inch heart-shaped coookie cutter (or template)
- double-sided tape
- metallic red pipe cleaner
- 1 pair large wiggly eyes
- scissors
- wire cutters
- red permanent marker

Instructions:
Step 1: Fold the long side of the 10 x 7 inch cardstock in half, so the folded card is 5 x 7 inches.

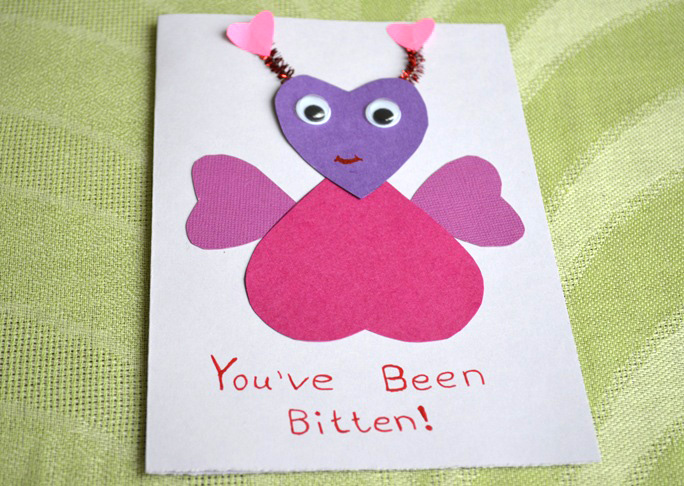
Step 2: Trace the 3 inch heart onto the dark pink cardstock and cut it out. This will be the Love Bug’s body.
Step 3: Trace the 2 inch heart onto the purple cardstock and cut it out. This will be the Love Bug’s head.
Step 4: Trace the 1 ½ inch heart twice onto the pink cardstock and cut both hearts out. These will be the Love Bug’s wings.
Step 5: Place the 3 inch heart (the Love Bug’s body) upside-down a little below the center of the front of the card. Use double-sided tape to hold it in place.
Step 6: Add the 2 inch heart (the Love Bug’s head) right-side up above the Love Bug’s body with a little overlap between the points of the hearts. Use the double-sided tape to hold the heart in place.
Step 7: Add the Love Bug’s wings by placing the 1 ½ inch hearts on the sides of the Love Bug’s body, about 1/3 of the way down on each side. Tuck the heart points of the wing’s under the body so they are positioned sideways on the card. Secure the heart wings in place with the double-sided tape.

Step 8: Add a pair of wiggly eyes to the Love Bug’s face.

Step 9: Use wire cutters to cut two 1 inch pieces from the red pipe cleaner for the Love Bug’s antennae.
Step 10: Trace ½ inch heart twice onto the light pink cardstock and cut both hearts out. These will be the ends of the Love Bug’s antennae.
Step 11: Use the double sided tape to secure each light pink heart to one end of each of the red pipe cleaner pieces. Use double-sided tape to secure the other end of each antennae behind the Love Bug’s head.
Step 12: Use a red permanent marker to make the Love Bug’s mouth.

Step 13: Add your message to the bottom of the card. Let your child choose the message, or write: You’ve Been Bitten!.

Step 14: Add the remaining part of your message to the inside of the card. Try: By The Love Bug! and/or Happy Valentine’s Day! or make up your own message!
Step 15 (optional): Add a second Love Bug face to the inside of the card above your message. To do this, cut a second 2 inch heart and secure it to the inside of the card with double-sided tape. Then, repeat steps 8 – 12.

Find more fun ideas from Linette Gerlach at The Kid’s Fun Review.


