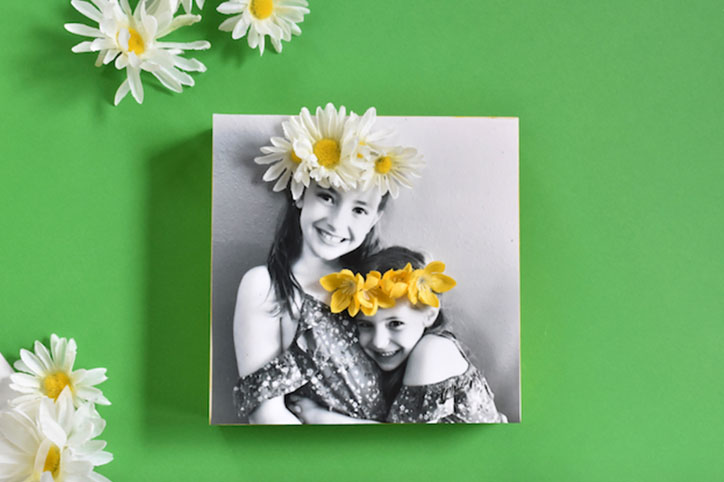

There are two items I love inside my house at all times, flowers and photographs. They make me happy, and lift my spirits. It’s not always feasible since fresh flowers don’t live forever (and cost a lot of money); however, photographs do live forever, so I found a way to bring them together in a beautiful way so they can both live permanently in my home. Recently I made a pretty, DIY 3-dimensional flower frame that makes puts a smile on my face every time I walk by it. If you can’t wear a flower crown everyday, then at least wear one in a photo, right?
This 3D flower frame requires zero water, because the flowers are not real. And, the other good news is you don’t need to be a florist to design a crown either. Find the best spot for the flowers on the subject’s head, and with some hot glue, the crown magic will happen. Here’s how to create your own 3D photo frame with flowers.
Materials:
- Unfinished wood box frames, Oriental Trading Company
- 8×8 photo prints
- Mod Podge
- Foam brush
- Faux flowers, small blooms are best
- Hot glue gun and hot glue
- X-acto knife
- Acrylic paint
Directions:

Step 1: Find a good photo of family and friends you can crown with flowers, or somehow add flowers to the scene (in a field, or a park, etc). I like black and white photos best for this project, so the flowers pop, but you can keep it color if you want. My frame boxes were 6×6, so I had 8×8 photos developed. Add the box on top of the photo, and with an X-acto knife, cut along the edges so the photo is the size of the box.

Step 2: Paint the sides of the unfinished wood box yellow, or the paint color of your choice. I painted it yellow to match some of the flowers I used. This paint will help the colors pop, and define the black and white photo, too.


Step 3: Add a thin layer of Mod Podge to the wood frame, and add the photo on top. Then, cover it with another thin layer of Mod Podge.


Step 4: Once the Mod Podge is dry (it will no longer look milky in appearance), you can begin to glue the flowers. The smaller the flowers, the better, so look for stems with tiny flowers. The photos with larger size faces look best with the flower crowns. One by one, cut the stem off the back of the flowers (so it’s a flatter surface to glue), and then lay the flowers out how you want them to look, and once you have it just right, begin to glue the flowers.

I love the box frames because they can stand alone, or hang on a wall. However you choose to display it, it’s a beautiful and unique addition to any space. Get flower happy on this one, everyone!