I’m convinced my house contains more stuffed animals than any other house. Ever. My older daughter is in Girl Scouts, so she’s constantly getting new stuffies for cookie sale rewards and fun team-bonding outings with the troop. My younger girl went through an intense rainbow unicorn phase last year, and nearly every kid that came to her birthday gifted her with a colorful, stuffed unicorn. And, I can’t neglect to mention the grandma factor. Grandmas really love to make it rain stuffed animals, don’t they?
As though this constant flow of toys isn’t crazy enough, my daughter likes to rotate which of her smaller animals she sleeps with at night. Now, she has a lineup of 10 different toys at the foot of her bed. Half of them end up on the floor by morning because of her wild sleeping. I got the bright idea to create a bedside basket that she can use to store and display the little toys she wants to keep close by. I really like the look of rope baskets, but I didn’t want to freehand sew a length of rope into a basket shape, and I didn’t want to spend so much money on supplies that I could have just as easily bought a store-made one. So I made this easy, super inexpensive DIY rope basket. Don’t worry, it’s so simple that you don’t need any real crafting talent to create your own.

Supplies:
- cardboard box
- clothesline rope
- hot glue gun and glue sticks
- felt sheets or yardage
- scissors
- mini-banner or pom pom decor (optional)
Instructions:

Step 1: Select a cardboard box large enough to contain some of your kid’s stuffed animals.

Step 2: Using the box as a template, cut pieces of felt to line the inside of the box. Cut each piece .25″ taller than the box. Using hot glue, line the inside of the box with the felt, and fold the excess .25″ fabric over the top edge of the box. Glue it to the outside of the box. Set aside to dry.

Step 3: Starting at the back of your box, align the end of the rope with the bottom edge of the box. Use hot glue to adhere the rope, then wrap it around the front of the box. Apply a few dots of hot glue along the edge of the box to secure the rope. Continue wrapping the rope and applying dabs of hot glue until you have covered the entire box. Set aside to dry.

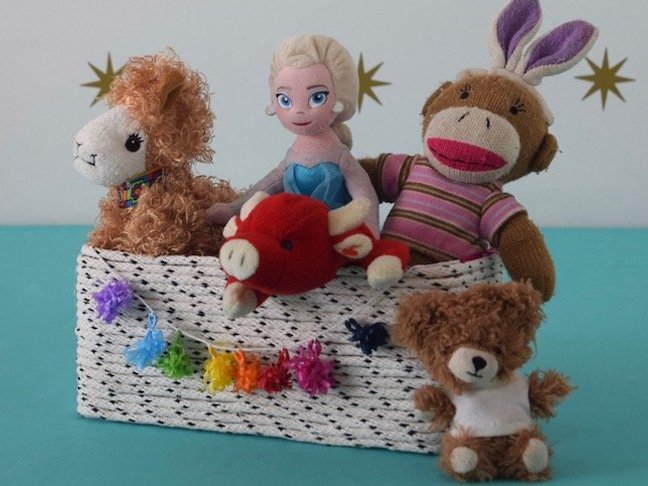
Step 4: Drape a decorative mini banner or pom pom tassel from the top edge of your finished basket. Arrange stuffed animals or other small trinkets inside, and display and organize like a pro.
Now, my girl can keep her stuffies right by her bed so she can easily switch up which one she wants to snuggle at bedtime. No more pile of tiny toys at the foot of the bed anymore.
Like what you see? Don’t forget to Pin it!