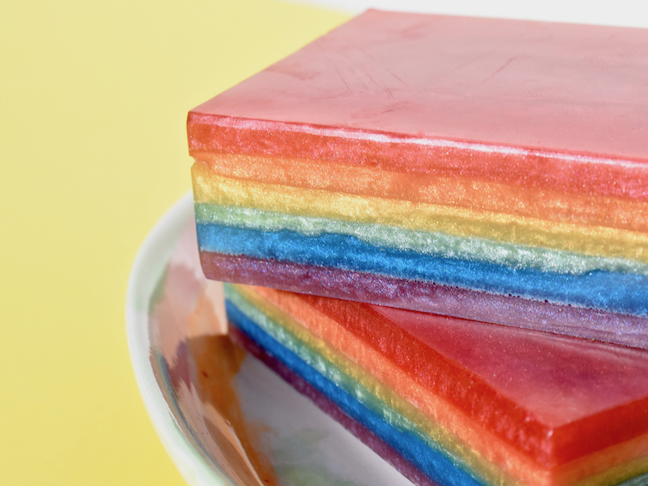

I’ve spent the past few weeks trying to keep the kids busy with winter crafts. And despite the weather, I’m really ready for spring, which means it’s time to celebrate sunshine, flowers, rain and rainbows again. This DIY rainbow soap was inspired by spring (and of course, St. Patrick’s Day, too). Not only does this DIY rainbow soap brighten my family’s day every time we see it, but it also washes our hands of all those pesky winter germs.
I showed my 8-year-old daughter how to make the first one, and now she’s a DIY soap-making machine. If she can do it, you can do it too! We’ve made colorful soap for friends, classmates, family and neighbors.
Here’s how to add rainbow cheer, and maybe a little luck, next to your bathroom or kitchen sink this March.
Ingredients:
- Clear glycerin soap
- Soap pigment
- Silicone soap mold, I used this one
- Cookie cutter, I used this one, and this one
- Isopropyl alcohol, or rubbing alcohol
- Essential oils, my favorite for soap are doTERRA peppermint and lavender, as well as Citrus Bliss or Wild Orange
Directions:

Step 1: If your glycerin base doesn’t come with cubes already molded, begin to cut 1×2 inch cubes, They are easy to cut with a knife. Try to make all the squares similar in size.


Step 2: Melt about 2 cubes in a microwave and heat-safe glass in the microwave. You will only need to set the time for 10-12 seconds. Once the soap is melted, move swiftly with the color, so the soap doesn’t harden. If it does harden, just heat it up again.
Step 3: To color the soap, you can add the 1/8 teaspoon of powder (small amounts go a long way, so play with it) after the soap has melted, and then stir it. If you do this method, have a spray bottle of alcohol on-hand so that you can spray it in the melted soap to get rid of the bubbles that form. Or, you can spray 8-10 pumps of the alcohol in small pre-disposable cups and pour the color powder in there first, and then pour that into the melted soap. I found this method works best to limit the bubbles. After you add color, add the essential oils, too. I used two drops for every rainbow layer.

Step 4: Pour the colored and scented soap into the mold.

Step 5: Repeat steps 2 and 3 for every color of the rainbow. Wait about 5 to 10 minutes between each layer. Also, between each layer, make sure to spray the layer in the mold with alcohol first, and then pour the next layer on top. This is to prevent bubbles, and help each layer adhere better.


Step 6: Once the last layer is poured, wait about 12-24 hours to remove the soap from the mold.

More DIY Soap Ideas: