
Batman, Superman and Thor are heroes with super powers. All of them have one thing in common (besides being good guys who fight villains); they wear capes. There’s something magical about capes, especially for kids. It shifts their mindset into a superhero state-of-mind. I know my kids are superheroes who possess their own superhuman strength, but when they wear a cape they act more bold and courageous, because they imagine that they are real superheroes. When my oldest son was young, he wore a superhero cape every day from dusk until dawn. I miss those days. So much so, I’m taking advantage of my younger kids who still play dress up, and pretend to be superheroes. But, of course, they are in need of a new cape.
As you know, I don’t know how to sew (it’s on the to learn someday list), so one afternoon I made two DIY no-sew capes. It was incredibly easy and totally affordable at less than $5 a cape. If you can cut and glue, you can do this! This tutorial is just in time for Halloween, in case any of those handmade costumes are in need of a DIY no-sew cape.
DIY No-Sew Cape
Materials:
- Felt, ½ yard for each cape as well as decorative felt to cut pieces.
- Hot glue gun and hot glue
- Sharp scissors
- Velcro for fabric
Directions:


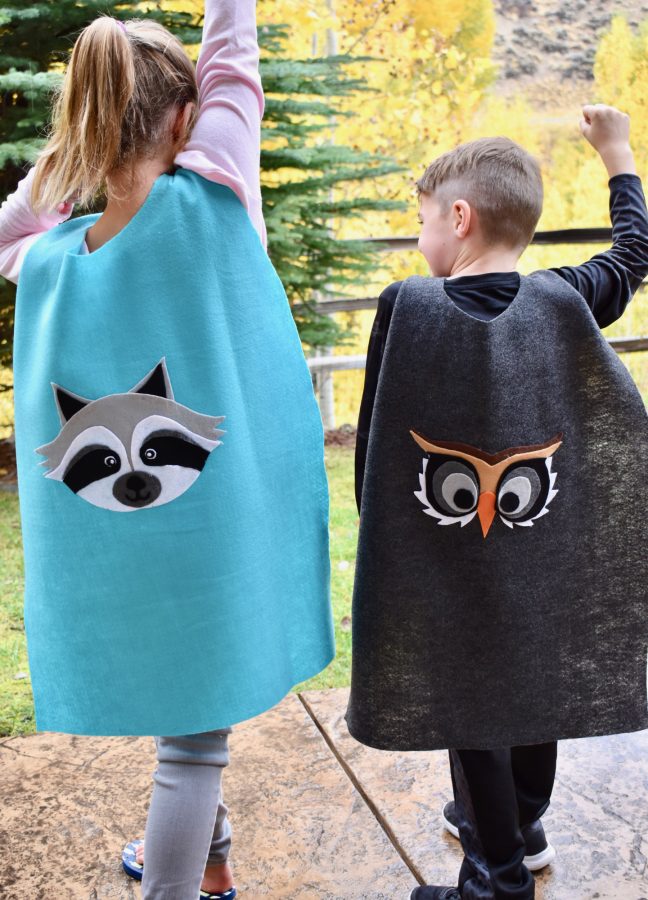
Step 1: Cut the cape to the size of your child. To do this, first fold the fabric in half. For the length, hold the cape up to your kids for a visual. For reference, my daughter is a tall 8-year-old, and her cape is 10 inches wide (folded) by 35 inches long. My 6-year-old’s cape is 9 inches wide (also folded) by 31 inches wide. To shape the top of the cape, first cut a small circle on the folded side of the cape, and then cut an arch on the other side. The photo with the teal cape on top of the gray felt fabric shows the type of cut you need to do. Once the cape is cut, you can always adjust. The first time I cut my daughter’s cape, the sides were too wide and they looked like wings off her shoulders, so I made the arch more narrow to go behind her shoulders. You can play with the cut a bit after the initial cut (just don’t be too bold with your first cut – leave a little room to cut more if need be).

Step 2: Cut the center of the neckline on the front of the cape. Measure the length around your child’s neck and shorten the two strips if you need to. Once the size is right for your child’s neck, use the hot glue gun to add two pieces of Velrco, one on the bottom of a strip, and the other on top of the opposite strip so they can attach.


Step 3: Decorate the cape. You can make traditional lightning bolts, superhero logos, or monograms. As your child what kind of hero they want to be. My kids are really into animals, so, they opted to have animal powers. When they put on their capes, they wanted to possess all the flying and nocturnal powers of an owl, and the feisty powers of a raccoon. To make their faces, I found an animal face or mask online, enlarged it in Microsoft Word, printed it and then cut all the pieces. Once I had all the pieces cut, I traced it onto felt, and then cut and glued the felt pieces together. I used a hot glue gun to adhere the faces to their capes.