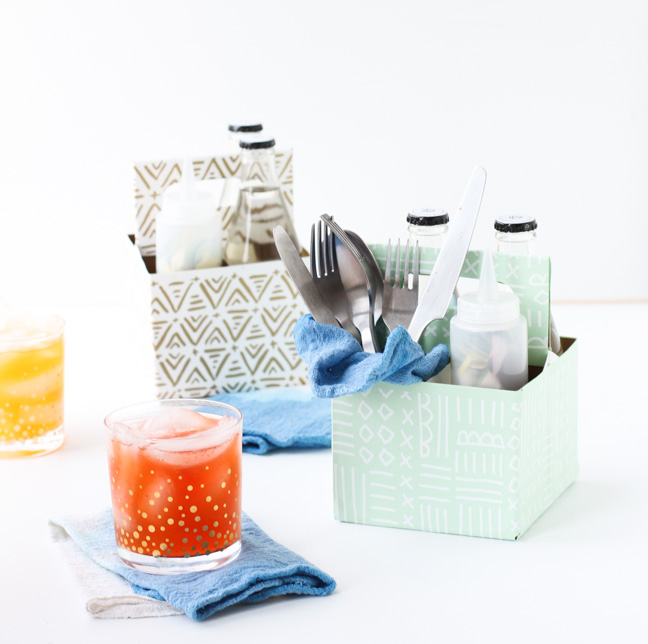


I don’t know about you, but I’m pretty excited about the fact that spring is finally rolling around. And to get into the spirit of warmer weather, I’m tackling a few outdoor inspired DIY projects, starting with this easy BBQ caddy for utensils, condiments, etc. It’s made from a recycled cardboard bottle carrier and is as simple as resurfacing it with decorative paper. These are especially great if you’re taking a picnic to a park or the beach; it houses all the odds and ends you need, and if it gets destroyed you can simply throw it in the recycling bin.

Here’s how you can make your own decorative DIY condiment caddy this summer.


Supplies:
- Cardboard caddy
- Heavyweight decorative paper
- Scissors
- Ruler
- Brush
- Glue
- Pencil
Instructions:


Step 1: Measure the dimensions of the base of the caddy.
Use these dimensions to cut a single piece of paper that is large enough to cover all sides with some overlap (add one inch to both the length and width). Use the measurements to mark lines and fold along these lines. The folds will help the paper line up cleanly with the corners of the caddy during the gluing step.
Before moving onto the gluing, you can tape the bottom edges to keep the sides in place (as I did with mine).


Step 2: Apply glue to the flap on the short side of your paper and smooth it onto the caddy. Be sure to align the top edge of the caddy with the edge of the paper. Glue the rest of the paper to the caddy, one side at a time. Smooth out any air bubbles along the way.

Step 3: Flip your caddy over. I put the caddy in my lap for this step so that the handle wasn’t in the way. Cut triangular vents at each corner. Glue and smooth these flaps down.

Step 4: For the handle, measure the dimensions and double the height. Use these measurements to cut a single piece of paper. Then, fold the paper in half and use the fold as a guide for aligning the top of the handle with the center of the paper.

Step 5: Trace and cut the hole of the handle on both sides of the paper.

Step 6: Apply glue to the paper. Adhere the paper onto the handle, starting from the fold and smoothing out any air bubbles along the way.
Your caddy is ready! For extra durability, you can always seal it with Mod-Podge or another sealer.


This little tote makes a great decorative container for utensils, drinks, condiments, or even art supplies.
For even more summer DIYs to try, check out the tutorial for the dip-dyed indigo napkins pictured.
More Summer DIY Projects: