

One of the most difficult tasks for me, in running a business, is keeping track of my expenses in an organized way. Sometimes it’s difficult to remember to input every receipt and expense into a spreadsheet as soon as it comes in, at least for me. Which makes tax season a little bit more stressful than it needs to be.
So I came up with an easy way to solve that problem with a DIY receipt tracking board and organizer. If you don’t have a business to run, it will still work just as well for grocery receipts, bills, finding those shopping receipts when you need to return something, etc. It’s way better than trying to dig to the bottom of your purse to find things.
Bonus! It looks like a decorative piece of art when not in use. Here’s how to make your own DIY receipt organizer bulletin board.


Supplies:
- foam core
- decorative paper
- paper envelopes
- craft glue stick and hot glue gun
- yardstick
- box cutter or precision knife
- heavy duty yarn, string, or cording
- number stickers
Instructions:

Step 1: Measure the mid point on the long end of the top of your foam core. Then, line up a yardstick to that midpoint and the bottom corner of the foam core. Cut with a box cutter.

Step 2: Repeat this process with the other side, so you’re left with a triangle shape, as shown in the photo.

Step 3: Next, apply glue to the triangle, all over, and attach decorative paper to the triangle as you go, making sure to leave excess paper hanging over all edges.

Step 4: Next, line up the yardstick next to one of the sides of the triangle, as shown. Then cut off excess paper with a box cutter or scissors. Repeat this process all the way around.

Step 5: Flip the triangle over and run a bead of hot glue across each side. Then pull the excess paper over and attach to the back of the triangle.

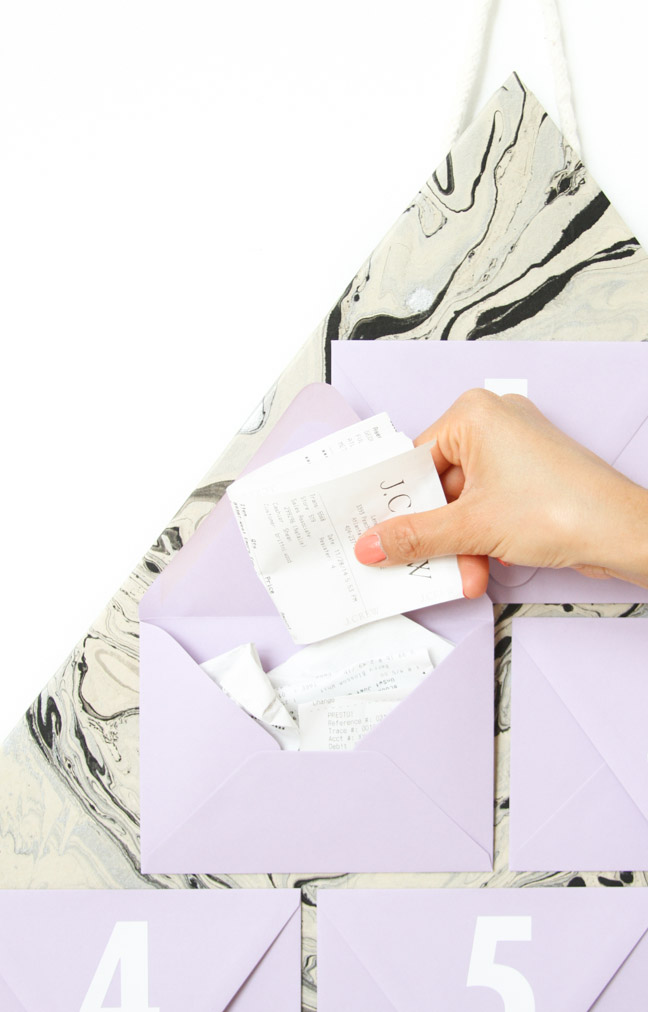
Step 6: Flip the triangle back over to the front. Now you can begin attaching the envelopes with hot glue. To make the most out of the space, I created three rows of envelopes. The first row has one envelope, the second row has two envelopes, and the third row has three envelopes.

Step 7: Add a number to the opening flap of each envelope. If you have five envelopes, you’ll have six numbers (1-6). Now you have an envelope for every week of the month and an extra envelope or two for odd paperwork, notes, receipts for shopping returns, etc.

Step 8: Lastly, add a string or cording loop to the back that the receipt board can hang easily from. Then, it’s ready to hang.

Every time you get a new receipt, add it into that week’s envelope, and at the end of each week you can go through it and track your spending, etc.


More Home Organization Ideas: