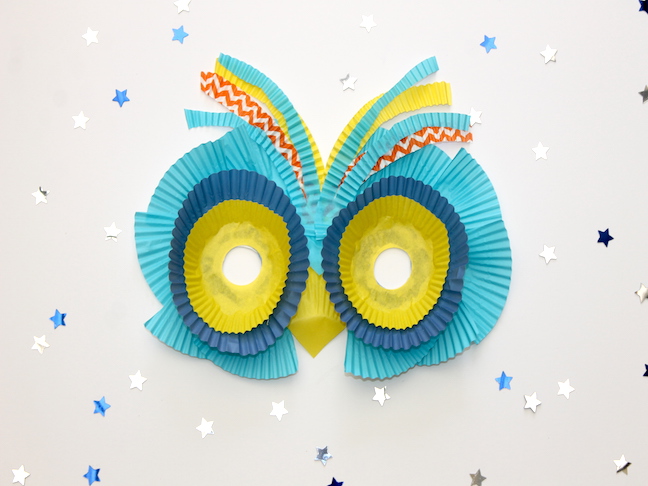

My son Kai loves crafts. We’re always perusing Pinterest to find a new craft that we can make together. When looking for projects to make, I always steer him to things that we can make using things we already have at home. I mean, why buy extra things to make crafts if you don’t have to? That’s why I love this owl mask DIY project. It uses three things that you probably have lying around in your house: a paper plate, cupcake liners, and ribbon (or elastic, if you have some).
Supplies:
- Cupcake liners (I used four colors, but you can use what you have.)
- Paper plate
- Ribbon or elastic
- Pencil
- Scissors
- 1” craft punch (optional)
- Glue
- Hole punch
Instructions:
Step 1: Draw a mask shape on a paper plate with a pencil.
RELATED: 15 Best Paper Plate Crafts for Kids

Step 2: Cut out the mask shape with scissors.

Step 3: Make the feathers for the mask by cutting a cupcake liner in fourths.

Step 4: Since the craft punch can’t fit into the center of the cupcake liner, make the eyes by folding a cupcake liner in half.

Step 5: Then use the 1” craft punch to punch into half of the cupcake liner. Make four cupcake-liner owl eyes.

Step 6: Make a beak by cutting a yellow cupcake liner in fourths.

Step 7: Cut off half of the top of the cupcake liner from two of the owl’s eyes.

Step 8: Glue the small cupcake-liner owl eyes into the larger owl eyes.

Step 9: Glue the liners that were cut into quarters onto the mask.

Step 10: Glue the yellow beak onto the mask.

Step 11: Cut off half of the top of the cupcake liners for extra feathers for the top of the mask.

Step 12: Glue the cupcake-liner strips to the top of the mask.

Step 13: Glue the eyes to the mask.

Step 14: Once the mask is dry, use a hole punch to punch a hole on either side of the back of the mask.

Step 15: Tie a ribbon or a piece of elastic and tie to the two holes.

Project complete!
More Kids Crafts: