
My dad taught me at a young age to save my pennies. His important life lessons worked because now that I’m a parent, I find myself telling my children the same thing when it comes to money — save, save, save.
My kids’ first and only “banking experience” has been with their piggy banks, with no annual fees or interest. There’s nothing like the joy of finding extra change around the house, or better yet, earning it through chores, and then hearing the clink as the coins drop into the bank.
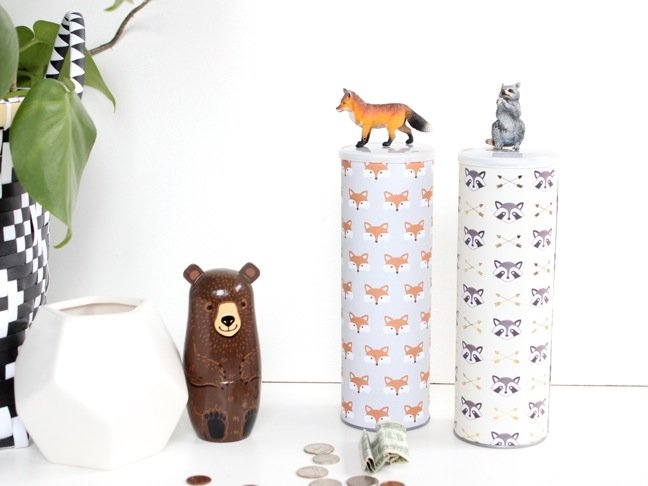
Recently, my sons’s ceramic piggy bank broke, and my other son wanted something new to save money in for a new Lego set. Luckily for me, I didn’t have to look any further than my kitchen pantry. The potato chip can (think Pringles) my kids begged me to buy at the grocery last week is now their new and improved piggy bank. We saved money in the process since we upcycled the container, and the paper only cost about $2.
Looking to teach your kids how to save money? This DIY piggy bank takes less than 10 minutes to make. Here’s how to do it.
Supplies:
- Chip can, Pringles or Veggie Chips (including the lid)
- 12×12 Cardstock paper or wrapping paper (there are so many cute options in stores, or at Paper Source)
- Gorilla Super Glue Gel
- X-acto knife
Instructions:


Step 1: Wrap the paper around the chip can. Hold it in place with your hand as you wrap, starting with the bottom corner slightly crooked (my favorite trick for getting the wrap to go on evenly). Add glue to that bottom corner, and along the edge to the top corner and press down to glue the paper to the can.

Step 2: Continue to fully wrap the can and make sure the bottom edge of paper is lined up with the silver base of the can. Next, add glue to the remaining edge of the paper and press down. Now, your chip can should be fully wrapped with cute paper.

Step 3: Use your X-acto knife to cut the paper at the top along the edge of the can. You can do this as you wrap with your hands before it’s glued if you feel like you will need to adjust.

Step 4: A piggy bank is not a piggy bank without a slot to insert the money. Using the X-acto knife, cut a small slit in the center of the lid large enough for coins and folded dollars.

Step 5: My boys love animals, so they wanted an animal on top. To do this, add super glue to the bottom of a toy animal and add to the lid.

Step 6: Add the lid to the chip can, and you have yourself one cute, DIY piggy bank.


Happy saving!
Like what you see? Don’t forget to Pin it!