
If your house is anything like mine, school supplies often end up on the floor and in random places where they don’t belong. Some nights it’s hard enough to get my kids to sit down, focus, and actually start their homework; so when we can’t find the supplies, or when we do find the worksheet (and it’s wet or dirty from being on the kitchen counter), it makes homework even more stressful. I wanted to streamline the process; therefore, I have created a DIY homework station. It will be the one spot to keep all of the homework essentials, and on top of that it’s really cute (and easy to make). It’s not just any homework station; it’s a turntable station.
Want to make your own turntable homework station? You can make one in just four easy steps.
Supplies:
- Pine round, Home Depot
- Gorilla Glue
- Lazy Susan, Target
- Wide mouth Mason jars
- Velcro rounds
- Metal basket, $3 Target find
Instructions:


Step 1: Glue the Lazy Susan to the wood round. To do this, apply glue to the Lazy Susan, flip it over and press on to the center of the wood disc. Read the instructions on the Gorilla Glue bottle to ensure maximum strength.

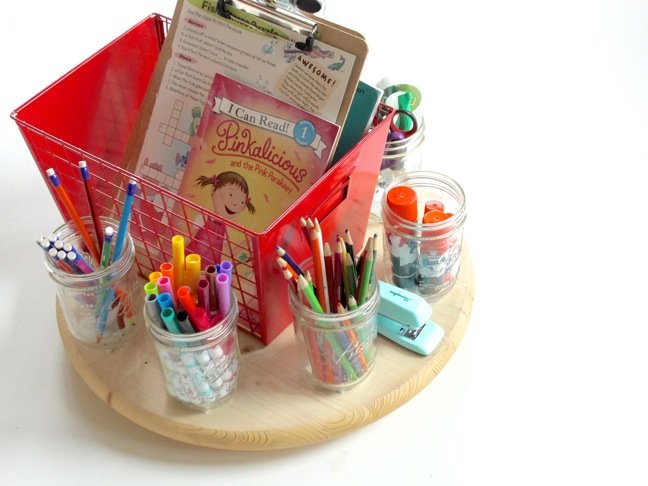
Step 2: Set the metal basket in the middle of the pine round, and then frame it with a circle of Mason jars. You can choose to either set the basket on the pine round, or glue it in place. With the supplies inside the basket, it will stay in place, so it’s okay if you choose not to glue it. The Mason jars will stay in place with velcro, so set them where you want them to be. Make sure you have enough space for the Mason jars. I made my homework station with six Mason jars, but the wood round can easily fit eight.


Step 3: Cut velcro in 2 inch x 2 inch squares (or whatever size will fit the base of your Mason jar), and stick one side of the velcro to the bottom of the jar, and the other on the wood round. Once at least 5 minutes have passed, you can stick the Mason jars on the velcro spots on the wood round.


Step 4: Add school supplies to the jars, and fill the basket. I separated my school supplies by category, such as pencils, markers, colored pencils, glue, scissors, and paint supplies. You can color coordinate the Mason jars, and fill them with whatever school supplies your kids use most. I love the basket in the middle because my kids always have loose papers, books to read, worksheets, index cards, and other paper or book items that need a “home.” A built-in perk with using a metal basket is that it attracts magnets. You can use it to hang photos, reminders, or a calendar like I did.


Bring on the homework!
Like what you see? Don’t forget to Pin it!