I jokingly refer to my crafting style as “Kindy Chic.” As a former Kindergarten teacher, there is one staple item in my craft cupboard: the humble paper plate. It can be transformed into so many creations. Try one of these three ideas and go for gold.
Fluttering Fairies

You will need:
- 1 large paper plate
- Paint (I used acrylic)
- Jewellery Wire
- Glue (I used PVA glue)
- Tape
- Markers
- Stapler
- Hole punch
- Scissors
Instructions:
- Paint the inner part and rim of your plate in two different colours.
- Once dried, flip your plate over and paint the back of your plate in another colour.
- Once both sides are dry, cut the inner circle out, leaving the rim intact.
- You will use this inner circle to make the fairy’s skirt.
- Fold the circle into eighths. You will use seven-eighths to create the skirt.
- Open your circle out and cut along one fold to the centre.

- Fold this eighth back- you will not glue this section but the section attached to it. (Cut this extra piece off. This will become the body of your fairy.) Check out the video to see how it’s done.
- You will use the rim to make the fairy’s wings.
- Fold the rim in half and then half again.
- Pinch together on the bottom fold.
- Push the outer half towards the middle to create an upper and lower wing. Repeat on the other side.

- Staple these parts together. Punch a single hole in the middle of the wings.
- Twist the end of a piece of jewellery wire.
- Cut out some legs and arms.
- Tape the legs to the underside of the skirt
- Thread wire through the top of the skirt then through hole in the wings.
- Cut out and decorate a face. Tape this and arms to the body.
- Tape torso to the wire.
Your fairies are ready to flutter.
Donut Bunting

You will need:
- Paper plates
- Paint (I used acrylic)
- Scissors
- Yarn or string
- Tape
Instructions:
The donut is formed from the inner circle of the plate. The sprinkles are created using the rim of the plate.
- Paint around the edge of the inner circle with orange.
- Paint your “icing.”
- Around the rim, paint different coloured sections for sprinkles.
- Once dried, cut the inner circle out.
- Trace around a small jar or bottle to create your donut hole.
- Cut this section out.
- Cut the rim of your plate into small, sprinkle-like pieces.
- Glue these onto your donuts.
- Attach your donuts to yarn or string with tape.
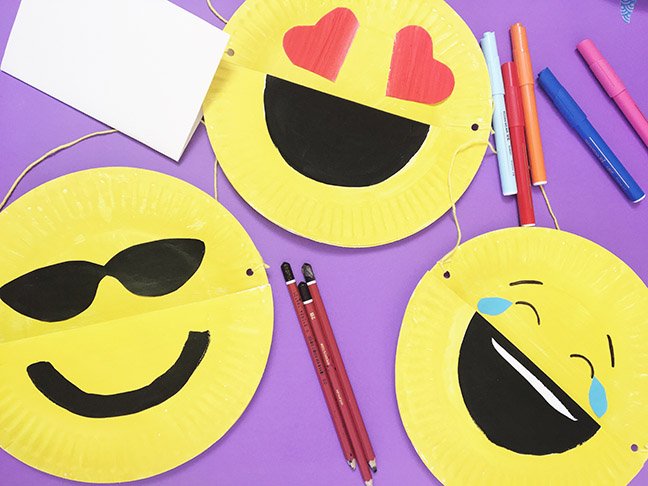
Emoji Desk Caddy

You will need:
- Two paper plates
- Paint (I used acrylics)
- Hole puncher
- Glue (I used PVA)
- Yarn
- Clips
Instructions:
- Paint the inner side of one plate all yellow.
- Fold your second plate in half.
- You will be painting the back of this plate.
- Paint this section in accordance with the emoji you have chosen.

- Once dried, cut this plate in half.
- Glue along the edges of this plate and secure to first plate. You might need to use clips to hold everything in place while drying.
- Cut out the eyes and glue down.
- Punch a hole on both sides. String some yarn through.
Time to organise your desk!
Is there anything a paper plate can’t be transformed into?
Pin for later: