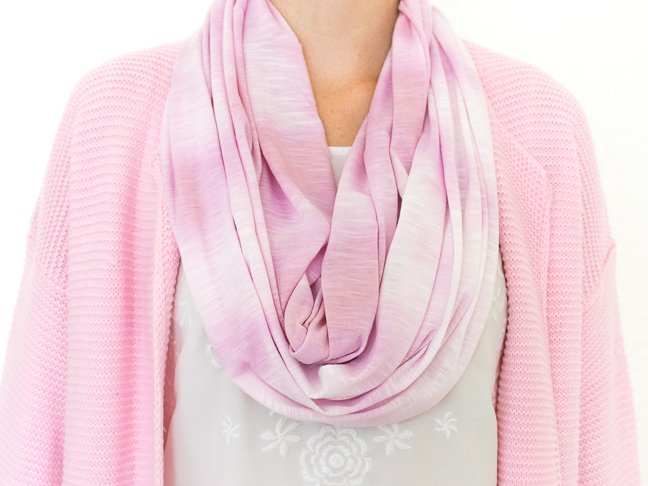
Shibori dyeing has recently made a comeback, bringing back the tie dye trend with a new, classy look. While Shibori dyeing is traditionally achieved with blocks and indigo dye, you can still achieve the look with any colorful dye of your choice. This simple DIY Shibori Block Dyed Scarf is the perfect accessory for spring, and simply using cut cardboard can help you achieve the same patterns traditionally seen in Shibori. It’s cool, isn’t it? I live in pretty scarves like this.
This is a great beginner DIY project or a perfect project for someone who doesn’t want to source a lot of unusual supplies. Using regular craft dye and cardboard, you can achieve a similar look in whatever color you want. In this case, I kept the color very light for a spring-inspired look.
Note: this triangle pattern is just one of many potential pattern options. You can also skip blocking all together and use only rubber bands. Remember that any fabric rubber banded will stay white, and areas blocked off by cardboard will determine the shape of the pattern, but some color will seep through the cardboard.

Supplies:
- Cardboard or wood blocks, cut into triangle or square shapes
- Rubber bands
- Rubber gloves
- White scarf
- Colored dye, liquid recommended
Instructions:
Step 1: Follow the instructions on the dye box. Usually, you must add the dye to very hot water. Make sure you’re wearing gloves and that you cover your work area with paper towels or a plastic bag to reduce the mess. Fill a container with plain water.
Step 2: Fold the scarf in half lengthwise. Then fold it multiple times across so that you have one long piece of fabric.

Step 3: At one end, fold the edge to a triangle and fold the triangle back and forth all the way across. Your scarf should now be folded into a small triangle shape.


Step 4: Use this as a template to cut two (or four if you want to double up like I did) pieces of cardboard the same shape and size. Place on either side of the folded scarf and rubber band very tightly.

Step 5: Once the dye is ready according to the box instructions, dunk the cardboard covered folded scarf in the plain water to saturate. Then place the scarf in the dye and submerge until completely saturated and a medium color is achieved.
It should remain in the dye longer to achieve a darker color, but note that this will also increase how much of the white becomes colored, so one minute is plenty of time.
Step 6: After about 30 seconds to one minute in the dye, carefully remove it and set on your covered surface for about 5 minutes.
Step 7: Rinse the scarf in cool plain water until the water runs clear. Then cut the rubber bands off and carefully peel back the cardboard and dispose.


Step 8: Wash and dry the scarf with a mild detergent so that the color will not stain you or your other clothes when wearing it. Once dry, it’s ready to wear and show off!
The triangle fold leaves a unique pattern with some white and some colored areas, and even though it’s Shibori-style dyeing, it has a completely unique look for spring!