
If you’re looking for a Mother’s Day gift idea that doubles as a great creative play activity for your kids, I have the perfect DIY for you! These watercolor cookies have steps that can suit all different ages, and it is plenty of fun for all. Plus, when it’s all over, you have a pretty and tasty treat to snack on that everyone wll love. – xo, Maddy
Supplies:
- your favorite sugar cookie recipe and its ingredients
- nested cookie cutter set (like this circle set)
- rolling pin (fondant rolling pin recommended)
- parchment paper
- 1/8″ and 1/4″ thick dowels, 2 each
- white fondant
- can of white icing
- offset spatula
- unused paint palette
- assorted pastry brushes (recommended) OR unused craft paint brushes
- clear vanilla extract (available in baking aisle of most craft stores)
- gel food coloring in your choice of shades
- toothpicks
- paper towels
Instructions:
Step 1: Create your sugar cookie dough according to the recipe instructions, omitting baking powder if it is included in the recipe. Baking powder causes the cookies to spread during baking, and omitting it will help the cookies retain their original shapes. For this reason, do not use store bought cookie dough for this project.
Step 2: Roll out your dough using the dowel method: on a clean surface covered with parchment paper, place a ball of dough and two 1/4″ dowels on ether side of it. These dowels will serve as the “guides” for the rolling pin to ensure the cookies are 1/4″ thick throughout. Place your rolling pin on top of the two dowels, and roll the dough out as normal. Cool your dough on a baking sheet in the fridge for 10–15 minutes, then cut the shapes out of the dough. Let the shapes cool in the fridge for another 10–15 minutes (or as directed by the recipe), then bake according to the recipe instructions. Set the cookies aside to cool, then store in an airtight container until ready to use.

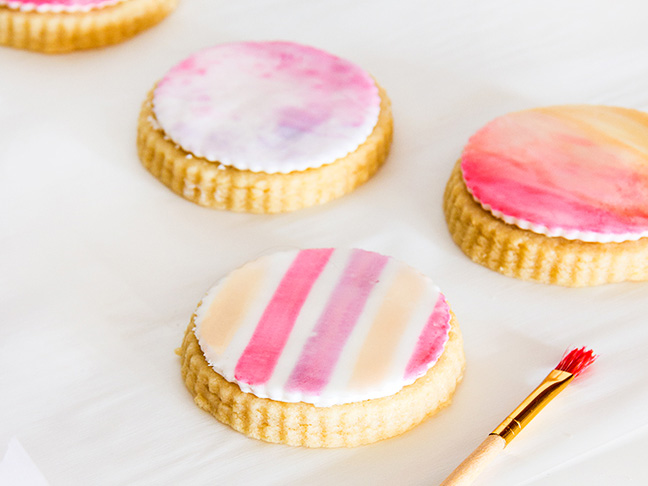
Step 3: Roll out the fondant to 1/8″ thick using the dowel method. If you’re using a fondant roller (recommended for a truly flat surface to the fondant), dowels will likely not be necessary. Most fondant rollers come with plastic ring guides that have set thicknesses. Remove all of the rings except the 1/8″ inch rings from either side of the rolling pin, and roll out the fondant as usual. If you are using the same rolling pin you used to roll out the dough, clean and dry it first to ensure no grease or moisture transfers to the fondant.
Step 4: Cut the fondant using the same cookie cutter you used to cut the cookies. Like the rolling pin, it should be cleaned and dried before use to prevent grease and moisture from transferring over. Set aside the fondant on parchment paper and allow it to air dry for an hour or two so that the top firms up a bit. It can be left out overnight, as well.

Step 5: Turn the dried fondant shapes upside down and spread a thin layer of white icing over the back with an offset spatula. Gently flip the fondant shape over and center it on top of a sugar cookie. Cover the cookie with a small bit of parchment paper and, with the palm in your hand, rub in small, gentle circles to “glue” the shape onto the cookie. Set the finished cookies aside and allow icing to air dry to “set” the fondant shape in place.

Step 6: While the fondant is setting, mix your food coloring watercolors. Because gel food coloring is very concentrated, you need very little for this project. Dip a toothpick into the gel food coloring to control how much is coming out, and dilute the food coloring with clear vanilla extract. (Note: Do not use water. The alcohol content in extract helps it evaporate faster in the air so your fondant and cookie won’t get soggy. It also adds some yummy extra flavor!) Test the colors by dipping the paintbrush and painting on a white paper towel.
Step 7: Paint the cookies as desired! Experiment with mixing colors, layering colors, and even removing color after it has been applied with a clean paper towel! Allow to dry for up to 30 minutes after being painted, and enjoy!
Photos: Maddy Hague of Splendid Supply Co.
More Cookie Recipes: