I spent the bulk of my childhood living in Orlando, Florida. So naturally, every chance my family had to get away for the day would lead us to a Disney theme park. One summer, I remember I was at Magic Kingdom so often I almost felt like I owned the place. I even had a few birthday parties at Blizzard Beach, a Disney themed water park.
Even now as an adult, my husband and I go back once a year or so even though we no longer live in Florida. It’s such a big draw for us; we feel that little tingling of magic when we’re there that we can’t get anywhere else. It’s something that I never tire of.
Since I’ve moved away from Orlando, I try to get my fix in little ways throughout the year, whether it be through watching my favorite Disney movie, or whipping up a fun craft project.
Tinkerbell is the inspiration for this particular shaving cream art project. It’s a great craft project for younger kids, and there’s virtually no right or wrong way to create unique, fairy dust-sprinkled works of art.
Using shaving cream, fairy dust, and a little imagination, I’ll show you how to take materials you likely already have on hand to create a magically fun afternoon of art, Tinkerbell style.

Supplies:
- shaving cream
- food coloring
- glitter
- heavy card stock (in various shapes and sizes)
- container for “paints”
- straws or plastic utensils for stirring
- straight edge or squeegee
Instructions:

Method 1: Freestyle
Step 1: Add shaving cream to container(s).

Step 2: Add one to two drops of food coloring into the container(s).

Step 3: Stir with straw or plastic utensil until the food coloring is completely mixed in.

Step 4: Add glitter and start painting. You can paint directly onto your yardstick with the shaving cream foam.

Step 5: Let the shaving cream paint sit on the card stock for three to five minutes. Then, using a straight edge (like a ruler) or a squeegee, gently scrape the foam off of the surface and allow the surface to completely dry. You now have a cool piece of artwork that is ready to be framed.

Alternatively, you can also use shaving cream and food coloring to create more of a marbled effect. Here’s how that process works…
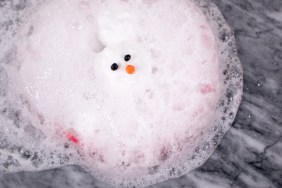
Method 2: Marbling

Step 1: Add shaving cream into a large disposable pan or plate.

Step 2: Add drops of food coloring in various colors to the shaving cream in various areas.

Step 3: Swirl the food coloring around with a paper straw or plastic utensil, as shown in the photos.

Step 4: Place card stock into shaving cream paint and press down evenly with your hands across the entire surface.


Step 5: Remove the card stock and set it aside for three to five minutes. Then, using a straight edge (like a ruler) or a squeegee, gently scrape the foam off of the surface, just like in the first technique. Allow the surface to dry completely.


Tip: For an even more Disney inspired piece of art, use one large circle and two smaller circles for the dipping process. Once scraped and dry, glue the two smaller circles to the larger one to create a marbled Mickey silhouette.


This post was sponsored by Disney.