As my daughter gets older, I’m always looking for new ways to document her growth and changes. Yes, I’m that mom that does a first day of school picture to compare with a last day of school pic. And, I’ll admit that I took the time to do a video interview on my camera phone to ask her what she wants to be when she grows up, what she loves, what she hates, and all the things I want to remember about her at this fun age.

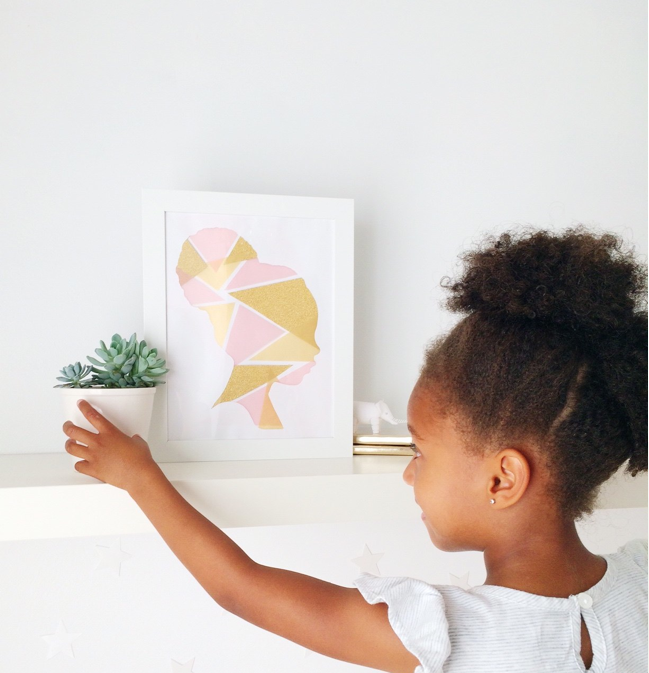
I’ve always loved silhouettes, but I wanted to add a fresh twist to fit my home’s more modern aesthetic. Voilà! This DIY silhouette art was born. Not only did kiddo help me cut and glue the triangles to fill her silhouette, she also helped decide where to place it in our home.
Supplies:
- 8.5″ x 11″ white card stock
- several colors/textures card stock (glitter, matte, vellum, etc.)
- small scissors
- glue stick
- tape
- flashlight
- pencil


Instructions:
Step 1: Tape a piece of white card stock onto a nearby wall. Using a flashlight to cast a shadow of your child’s head onto the paper, trace around the silhouette with pencil. Once complete, remove the paper from the wall.
Step 2: Working carefully, use the small scissors to pierce the center of the paper. Stick your scissors through the hole, and begin cutting the silhouette out being sure to leave the portion of the paper outside the silhouette line intact. Set aside.
Step 3: Cut triangles of various shapes (right triangle, isosceles, etc.) from the colored card stock. Turn your silhouette face down. If you want the completed silhouette to look toward the left, turn the paper so that it is facing to the right. Using the glue stick, adhere triangles to the card stock. Occasionally flip the silhouette over to check the spacing and arrangement of the triangles as you progress. If you’ve selected vellum paper, be sure to overlap some triangles to give the completed silhouette more dimension. Glue a plain sheet of white card stock to the back of the silhouette. Set aside to dry.
Step 4: Frame the completed silhouette, or attach directly to the wall with decorative washi or glitter tape.
Photos by Shauna Younge of Sweet Tooth for Momtastic
More DIY Home Decor Projects: