It’s that time of year again! The gifting season is approaching and, if you’re like me, you like to craft up a few little somethings for people who mean a lot to you…but you really don’t want to make bath scrub or seemingly infinite dozens of cookies again. We’ve all been there!
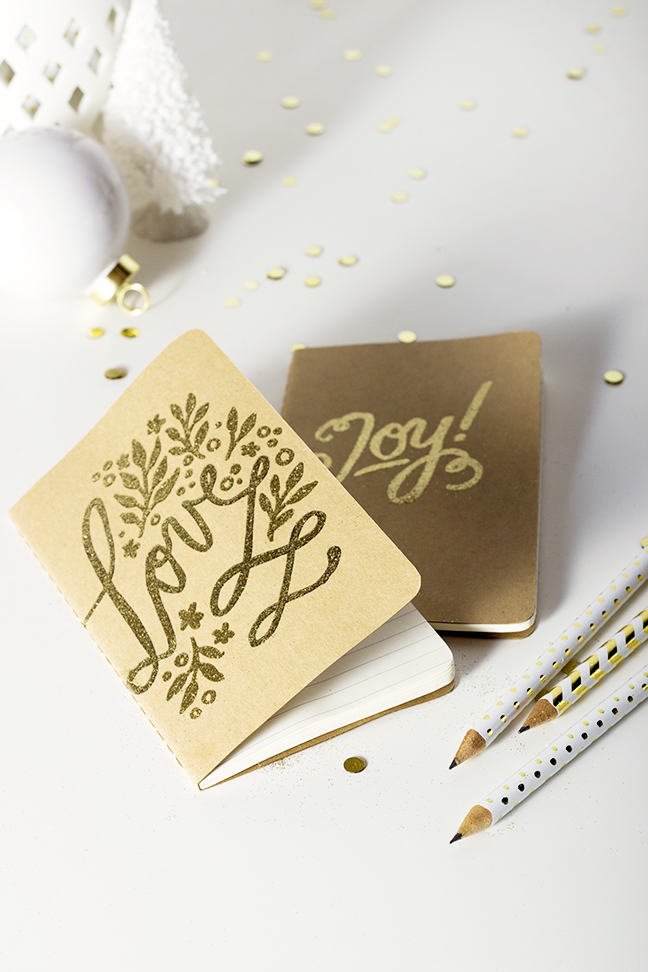
Enter the DIY I have prepared for you today: gold embossed hand lettered calligraphy notebooks. The size I used for this project was pocket sized, so it’s a perfect stocking stuffer for your pal on the go. Larger sizes can also be fun, and great for sketchbooks and lined journals alike. The best part is that the supplies will help you churn out a relatively large number of these books at a pretty low cost, so it’s a great way to show you care this holiday season while still on a budget (despite the high end look!).
Supplies:
- notebooks, preferably with a paper cover
- pencils, like Splendid Supply Co.’s gold foil patterned pencils
- embossing pens like this set
- embossing powder (I used gold glitter embossing powder.)
- embossing gun
Instructions:

Step 1: Using your pencil, lightly sketch out the design you want to emboss on the cover of your notebook. If you want the design to wrap around the cover, lay the book open, cover side up, as flat as possible. If you’re not confident in your sketching skills, no worries! Print out a design using a font you like, and then trace it onto the cover.

Step 2: Trace over the design with an embossing pen. Embossing pens contain a special ink that stays wet to secure the embossing powder in place, so you need to make sure you’re using the right kind of pen! The set I recommended comes with two colors: clear and black. Black is great for visibility while you’re working, but if you’re using a light embossing color and are concerned with show-through, use the clear.
Step 3: Liberally pour embossing powder over the design to make sure it is fully covered. You won’t need a whole lot, and will end up funneling much of it back into the container, but making sure all of the ink has powder to cling to is important! Put the excess back into the container, and shake it gently to remove any straggler powder. If necessary, you can also remove stubborn pieces with a Q-tip. Important: Any powder specks that are left behind will melt and become part of the design, whether it’s supposed to be there or not, so make sure to take the time to remove any bits you don’t want to have on your notebook!

Step 4: Warm up your embossing gun according to the tool’s instructions, and then aim the heater toward the embossing powder design. The tool doesn’t need to be super close to the paper in order to do its job, and paper covers can start to curl if it gets too hot, so keep your distance with it. As long as you visibly see the embossing powder melt within a few seconds, it’s working!
Step 5: Set the journal aside and allow the melted embossing powder to cool and set. If the notebook covers did curl, put a clean sheet of paper over the closed book, and then carefully put a weight on top of it and let it sit for several hours to flatten it. Try to avoid rubbing the design in case it hasn’t fully cured.
And that’s it! It’s SO incredibly easy and trendy—not to mention budget friendly!—that there’s no reason NOT to do this adorable project. Gift away, gals!
More DIY Gift Ideas:


