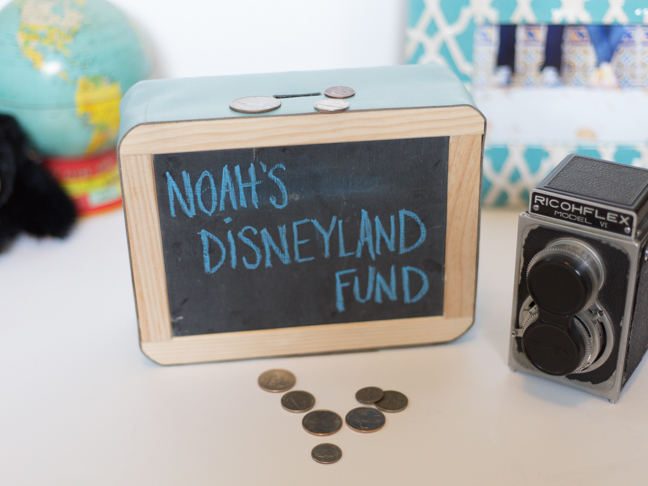

Now that summer is coming to a close, all the vacations are wrapped up and school is about to start. It is a great time to teach the kids about the benefits of saving money. If they start saving some of their allowance now, they can put it toward something fun next summer! Every kid needs a good piggy bank for their room, and this one has the added benefit of being labeled with what you are saving for. Out of just a strip of leather and a couple of small craft chalkboards, you can make an awesome little chalkboard piggy bank in no time.

Supplies:
- boards
- 3 inch wide strip of leather about a yard long
- E-6000 glue
- ruler
- X-Acto knife
- leather punch
- leather screw-ball stud
Instructions:
Step 1: After cutting your leather to size, it should be able to wrap around the edge of a chalkboard with about two to three inches of overlap. Place one end of the leather in the middle of the long side of the chalkboard, and glue along the edge of the chalkboard to secure the leather in place. You will want to do one edge at a time, and hold the leather in place until the glue dries a bit.

Step 2: Once you get the leather glued around the edge of one of your chalkboards, you want to cut the money slot in the leather. Using your ruler, find the mid point of the top edge of your bank and cut a coin slot out using your X-Acto knife.


Step 3: Now we want to create a way to fasten the bottom of the bank so that your money doesn’t come pouring out the bottom. Using your hole punch, make a hole where the bottom two flaps of leather overlap. Place your screw-ball stud in the inner flap and secure the other flap to your stud. This should seal the leather, and you can trim the excess away.

Step 4: Now glue the other chalkboard into place. Start with the long edge that is the top of the bank and glue it into place. Next, put glue on all three of the remaining sides and hold together all at once. Let dry completely, and your piggy bank is complete!

Step 5: Don’t forget to make a note in chalk about what you are saving for! You could even use the chalkboard to keep a running tally of how much you have in the bank.


More Piggy Bank Ideas: