These make a fabulous finishing touch to a guest’s bathroom, or even to the main bathroom when you know you have guests coming over. Best of all, Angel Soft toilet tissue is perfect for these origami projects because it’s durable and soft, so get toilet tissue crafting with your kids today!
Materials:
- Angel Soft Toilet Tissue
- hinge type clothespin
- invisible tape
- black marker
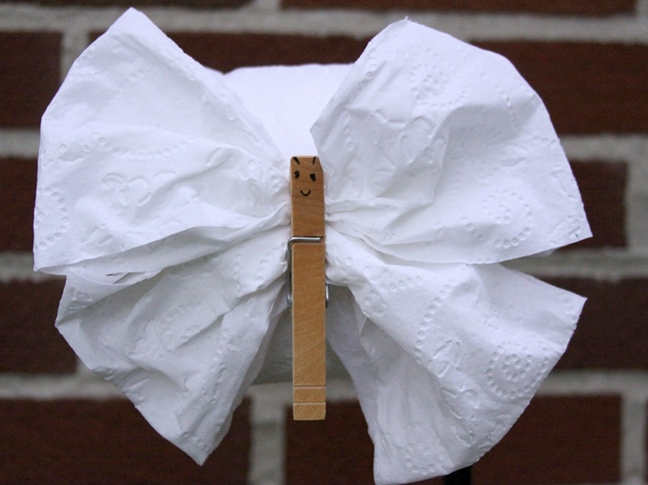
Make a Toilet Tissue Origami Butterfly
Instructions:
Step 1: Gently tear off 4 squares of toilet tissue.

Step 2: Fold the two squares on the end behind the two squares in the center, so only the center two squares are showing.

Step 3: Gather the center of the two squares together and clip it into the clothespin, this will be the first set of butterfly wings.

Step 4: Gently tear off another 4 squares of toilet tissue, and repeat the process. Pin the second set of wings just below the first in the clothespin.
Step 5: Draw the butterfly’s mouth and eyes on the clothespin.
Step 6: Fasten the butterfly to the toilet tissue roll by sliding the end of the toilet tissue into the end of the clothespin to hold it in place. Just be sure your guests or kids don’t try to flush the clothespin!

Make a Toilet Tissue Origami Bow Tie

Instructions:
Step 1: Gently tear off 4 squares of toilet tissue.
Step 2: Fold the two squares on the end behind the two squares in the center, so only the center two squares are showing.
Step 3: Roll out a couple squares of toilet tissue, but don’t tear them off the roll.
Step 4: Fold the tissue squares in half length wise.
Step 5: Gather the center together of the squares you folded in step 2.

Step 6: Wrap the folded toilet squares that are still attached to the roll around the center of the squares that are gathered in the middle to make the middle.of the bow.
Step 7: Lay the bow on the top of the toilet roll. It’s still attached so it shouldn’t go anywhere, but if you want to make sure it stays in place, anchor it with a small piece of invisible tape.
Make a Toilet Tissue Origami Fan

Instructions:
Step 1: Roll out about 10 squares of toilet tissue, but leave it attached to the roll.
Step 2: Fold the tissue back and forth about 1 inch wide, like an accordion. Keep folding until you’ve folded all ten squares.

Step 3: Hold one edge of the tissue tight, while you let the other side spread out into a fan.
Step 4: Wrap a tiny bit of toilet paper around the base to hold it in place, or put a small piece of invisible tape at the base of your fan to hold the ends together.
Make a Toilet Tissue Origami Rose

Instructions:
Step 1: Carefully tear off 2 squares of toilet tissue and set them aside.
Step 2: Roll out about six squares of toilet tissue, leave it attached to the roll.
Step 3: Fold the toilet tissue in half lengthwise.

Step 4: Roll the tissue around and around, keeping the base tight, and letting the top roll looser to form the rose. Keep rolling until you’ve rolled all six squares.
Step 5: Pick up one of the pieces of toilet tissue you set aside earlier. Pinch two ends together to form a leaf for your rose. Repeat the process with the second piece of toilet tissue.

Step 6: Anchor the rose in place with one leaf on each side, on the roll with a small piece of invisible tape.
*This post was sponsored by Angel Soft.