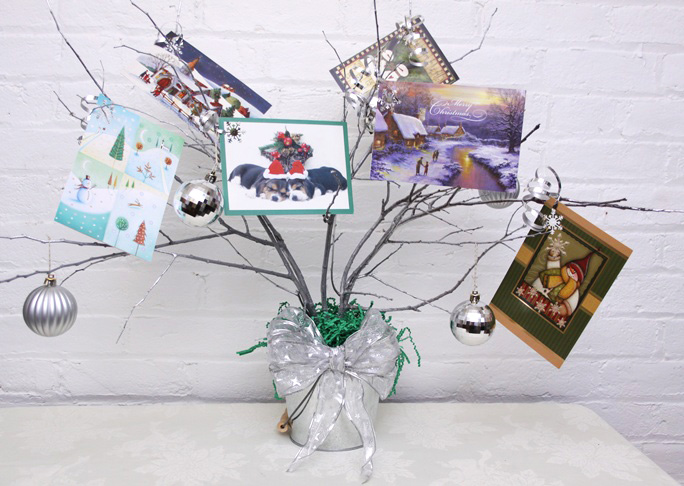
If you’re looking for a different way to display your holiday cards this year, check out this DIY holiday card tree. All you need is a few twigs from your yard and some silver paint. You can make it large or small, depending on how many cards you receive.
Materials:
- 7 inch or larger flower pot or container
- 1 bag floral stones
- floral foam piece to fit your container
- 3-4 tree branches
- silver spray paint
- glitter spray paint (optional)
- 2 yards 1 1/2 inch silver ribbon
- 1 handful green paper shreds
- 6 to 10~ 2 inch silver ornaments
- 1 roll 1/4 inch silver curling ribbon
- glue gun
- glue sticks
- hole punch or decorative punch
- your favorite holiday cards
Directions:
Step 1: Place the floral stones in the bottom of the flower pot or container to weight it down and keep it from tipping over when you add the branches and other decorations.

Step 2: Cut the foam piece to fit snugly into the top of the container to hold your card tree branches in place.

Step 3: Place the green paper shreds on top of the floral foam.

Step 4: Use the silver spray paint to paint the branches in a well ventilated area.

Step 5: Optional: Top the silver paint with a layer of silver glitter spray paint to give your tree an extra shimmer. Set the branches aside to let the paint dry.
Step 6: Insert the branches into the center of the floral foam, one branch at a time.

Step 7: Make a bow by wrapping 5 or 6 loops of ribbon, 6 to 8 inches wide. Hold the loops securely in the center.

Step 8: Wrap a second 14 to 18 inch piece of ribbon around the center and fasten it in place with a little bit of glue to gather and hold the center together. Leave about a 6 inch tail on each end. Cut the tips of each tail at an angle.
Step 9: Use your fingers to separate the loops on each end of the bow to form the loops on the bow. Keep working the loops until they’re all separated and look full.
Step 10: Use the hot glue gun to glue the bow to the top front center of the container.

Step 11: Use a hole punch or a decorative punch to punch a hole in the upper corner of the Christmas cards you want to display.

Step 12: Tie a 18 inch piece of curling ribbon to each card. Use a pair of scissors to carefully slide down the underside of the curling ribbon to make the ends curl.

Step 13: Add silver ornaments tied with silver curling ribbon to fill in between the cards.

Step 14: Place your card holder tree on a large shelf, fireplace mantle or on the floor depending on the size to display your favorite cards through the holiday season.