I love the look of wood molding and how it makes mirrors look much more expensive than the standard unframed glass that came in our house, but I had hesitated to attempt to add it because I thought creating my own molding was beyond my skill level. I decided to start small with a DIY frame for my bathroom mirror, and I surprised myself with how professional it ended up looking!
This project is totally doable, even if you’re a carpentry novice. Here is how I put together my simple but impactful DIY mirror frame. But first, get inspired by checking out these fifteen amazing and inspirational DIY bathroom mirror projects in the slideshow to decide on the look you want in your bathroom, then read on for the tutorial.
I am going to show you how to frame a bathroom mirror using a miter saw, but if you don’t have access to one, don’t fret: you can totally get this project done without one (I’ll show you how to do that, too).
RELATED: 31 Pottery Barn Inspired DIY Projects That Cost a Fraction of the Real Thing
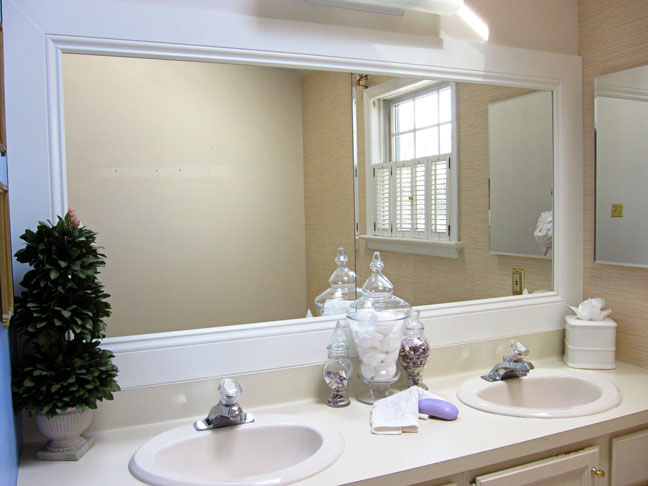
Below is a photo of my bathroom mirror before the project. It’s just a plain rectangular mirror (actually, it’s two placed together). The mirrors were originally hung with Mirror Mastic, which is a glue that won’t bleed through to the mirrored finish.

Supplies:
- MDF (primed) baseboard molding with cap 19/32” x 5¼”
- Miter saw
- Paint
- Paintbrush
- Caulk
- Liquid nails and caulk gun
- Pencil
- Measuring tape
Instructions:
Step 1: I went to Lowe’s with my mirror’s measurements. I needed three pieces of primed base with cap molding that I found in the molding aisle.


Step 2: I first had to measure the mirror and wall and cut four pieces of molding to fit using a miter saw. I set the miter saw on a forty-five degree angle. Since my mirror is a big rectangle, I needed two long pieces for the top and bottom and two shorter pieces for the left and right side of the mirror.

Step 3: Once your molding is cut, you need to paint the back of the molding near the top edge so the unfinished back won’t be reflected in the mirror when the molding is installed.

Step 4: Once that is dry, flip to the right side and paint one or two coats on all of your pieces. I used Sherwin Williams paint in Alabaster.

Step 5: Frame the mirror. Starting with the bottom piece, apply Liquid Nails to the back. I had the counter top backsplash to automatically level the piece. If you don’t have a backsplash, use a bubble level and mark with tape or a pencil where to place the molding to make sure it is level. Liquid Nails dries quickly, and you don’t have much time after you apply it to get it in place on the wall.
Step 6: Once the bottom piece is level and securely on the wall, add the side pieces in the same way and then the top piece last.

Step 7: If your mitered joints don’t match perfectly, caulk will be your best friend and make you look like a professional carpenter. I like to use Dap Alex Plus Easy Caulk. The only place I can find it anymore is at Walmart. It is the best caulk as you don’t need a caulk gun and the container makes it so easy to use—no mess.

If you can’t find the Easy Caulk, this should work just as well, if not better (plus, you don’t need a caulk gun if you buy this stuff: Dap Alex Plus All Purpose Acrylic Latex Caulk Plus Silicone 10.1 fl oz, 2-Pack ($10.78 on Amazon)
Step 8: Cut the nozzle on the tip of the caulk container on an angle, and then just run the tip of the can along the joint. Pretend it is a can of whipped cream and you have to add it to the joint. After the caulk is in the joint, run a wet finger over the line to smooth. If needed you can touch the area up with paint after the caulk is dry.


If you like the way the molding transformed the look of the mirror but are thinking that you don’t have a miter saw or the skills to do this yourself, READ ON about how easy no-miter molding is to work with.
Lowe’s and Home Depot both sell no-miter molding. It is so easy to use and a bit more decorative then the plain molding I used to frame my mirror. It eliminates difficult miter cuts, waste, and carpentry skills. It is a DIYer’s dream.
It comes unfinished…

…or primed. I like using the primed as it’s one less step for me to complete.
It goes together like this—a block at each corner with baseboard or trim molding on the top, bottom, and sides of the mirror.

All you have to do is measure your mirror’s width and height and take those measurements to the home improvement center. Pick your block and subtract the size of each block from the size of your mirror measurements. For example, say your mirror is 64″ long and you chose a 4″ square block for the corners. You would subtract 4 inches times 2 to get the length of the board that will go between them. It would be 56″ long.
Have your baseboard/trim molding cut to that size. Now when you get home, all the pieces—four blocks and four pieces of baseboard/trim—just have to be nailed up to the wall using Liquid Nails. EASY!
Home improvement stores will make straight cuts on wood for you—some may charge you fifty cents a cut, but most will do it for you for no extra cost.

Once you are successful and see how easy it is to frame out a mirror, you will be looking at every room of your home to see where you can apply your new skills. The hardest part of using no-miter molding will be deciding what decorative pieces and corner blocks to use.

More DIY Home Projects:
- The Easiest DIY Industrial Shelving Tutorial
- 101 Epic IKEA Hacks for Your Home
- 30 IKEA Malm Dresser Hacks
15 Bathroom Mirror Ideas and Inspiration
-
Mirror Storage Case
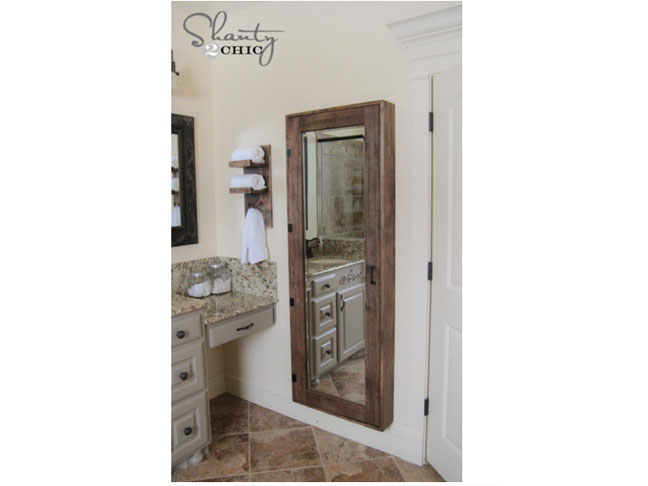
This DIY full-length bathroom mirror with storage cabinet is just about the coolest thing ever, and it's totally open to interpretation, so make it your own!
Get the DIY tutorial from Shanty 2 Chic.
Photo: Shanty 2 Chic
-
Pallet Mirror Shelf
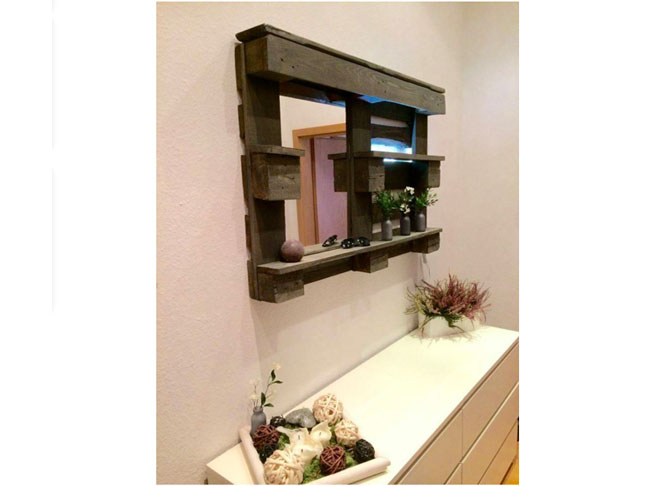
Upcycle an old pallet to create a bathroom mirror that is stylish, functional, and unique.
Get the DIY tutorial from 101 Pallets.
Photo: 101 Pallets
-
A Mirror on a Mirror
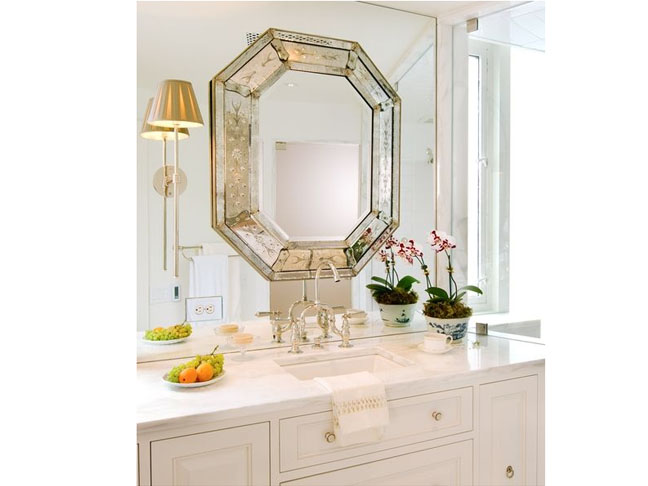
Hanging a smaller ornate, vintage, or modern mirror over larger mirror is a great way to add some creativity and sophistication to your bathroom vanity.
Get more photos and tips from Luxe & Lucid.
Photo: Luxe & Lucid
-
Farmhouse Vanity
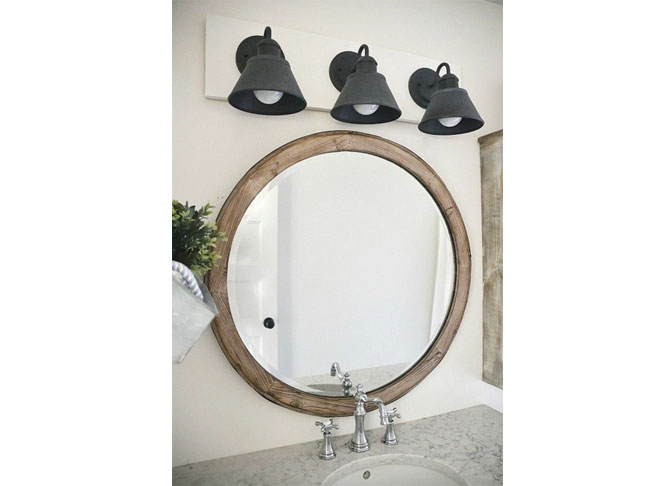
A round mirror and wall lanterns will give a rustic farmhouse appeal to your bathroom decor.
Get the light fixture DIY from Liz Marie Blog.
Photo: Liz Marie Blog
-
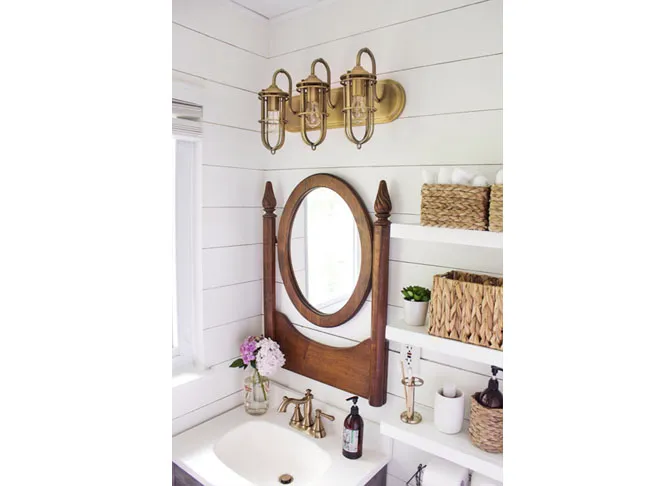
Vanity Mirror with Sconces
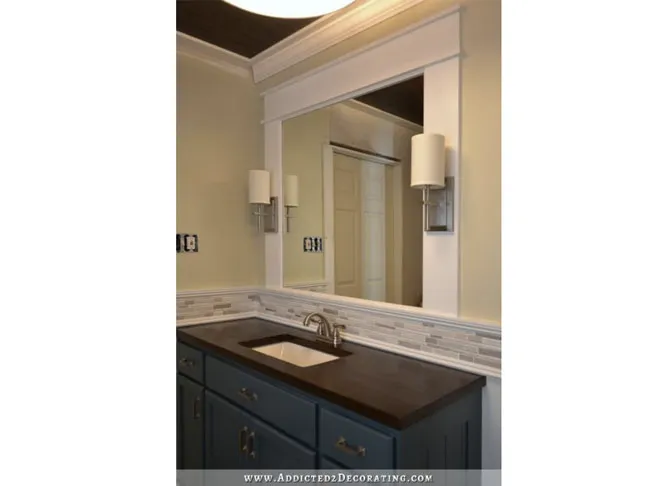
Sconces are a wonderful, stylish yet functional addition to any bathroom vanity. Along with the large frame, they are a great way to integrate the design of the whole room.
Get the DIY tutorial at Addicted 2 Decorating.
Photo: Addicted 2 Decorating
-
Amethyst Mirror
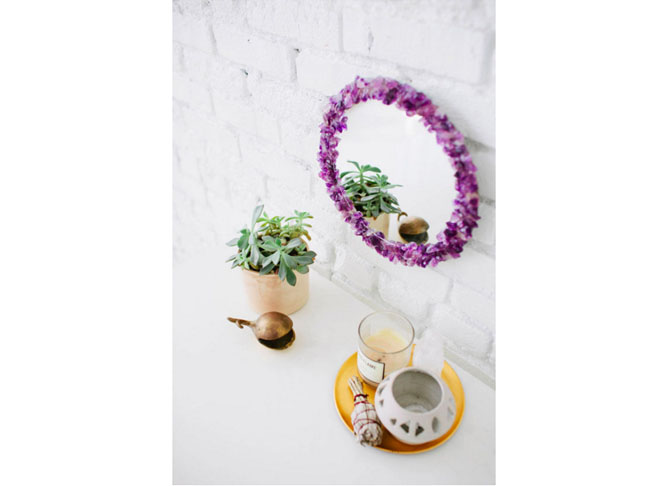
This adorable crystal mirror would make a dazzling accent in any room. Collect crystals from flea markets (or just order online), and give this easy DIY a try.
Get the DIY tutorial from Design Love Fest.
Photo: Design Love Fest
-
Hollywood-Style Mirror with Lights
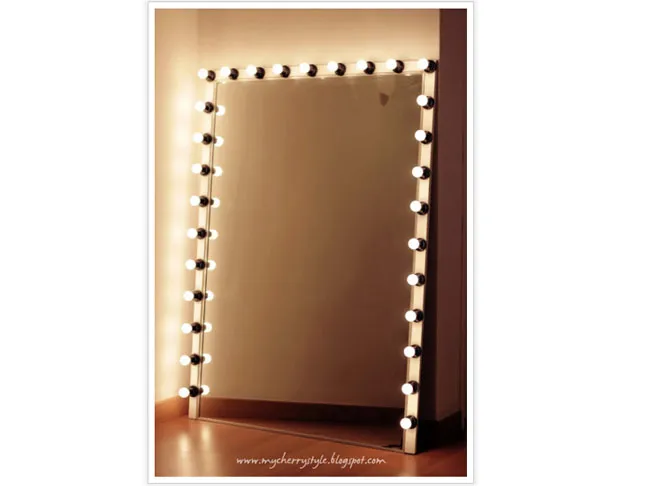
If you're looking for a super glam idea to spruce up an old mirror for the bathroom, bedroom, or elsewhere, check out this bright (and chic) idea.
Get the DIY tutorial from My Cherry Style.
Photo: My Cherry Style
-
Mirrored Dresser
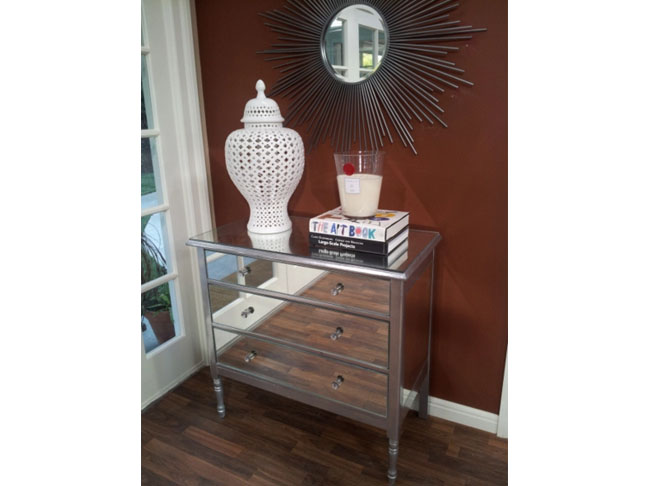
Mirrored furniture is a great way to brighten a room and add a little glitz and glam. They can get pretty pricey, so why not try making your own?
Get the DIY tutorial from The Tamara Blog.
Photo: The Tamara Blog
-
Rustic Wooden Mirror

Creating a gorgeous farmhouse frame for your mirror is a manageable, at-home project—and the results are stunning.
Get the DIY tutorial from Northstory.
Photo: Northstory
-
Vintage Dresser Mirror
Salvage the mirror from an old vintage dresser and showcase it in your bathroom for a splash of classic elegance.
See more photos and tips at Shades of Blue Interiors.
Photo: Shades of Blue Interiors
-
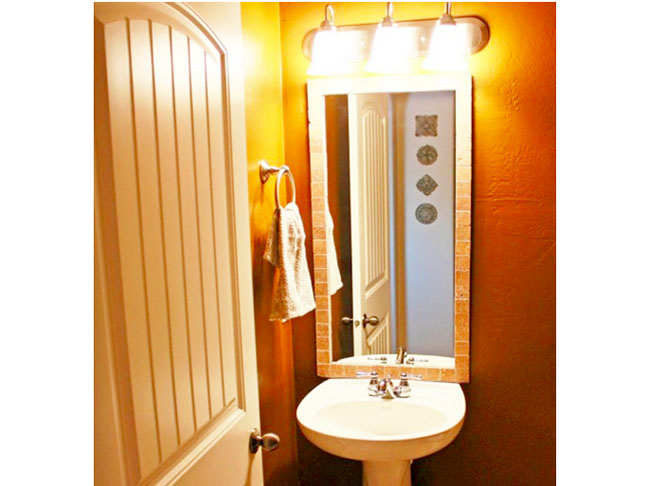
Tiled Mirror
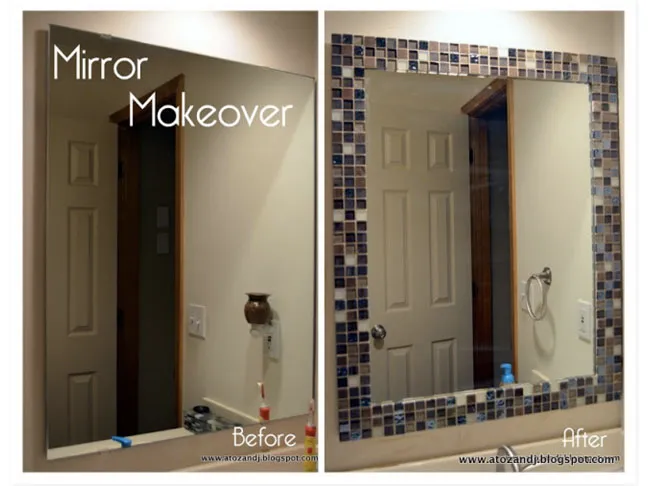
Update a boring old mirror with cool glass tiles. It's an easy DIY project that lends itself to lots of creativity.
Get the DIY tutorial from A to Z and J.
Photo: A to Z and J
-
Framed Medicine Cabinet
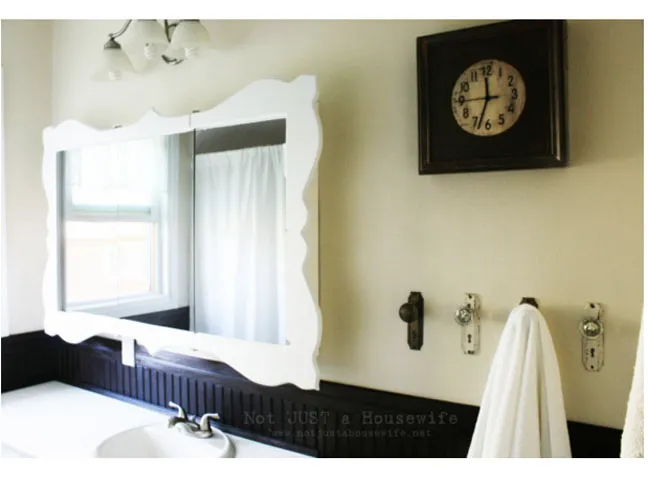
This hand-cut wooden frame is a great way to add some style to a boring old medicine cabinet.
Get the DIY tutorial from Not Just a Housewife.
Photo: Not Just a Housewife
-
Double Vanity with Shelving
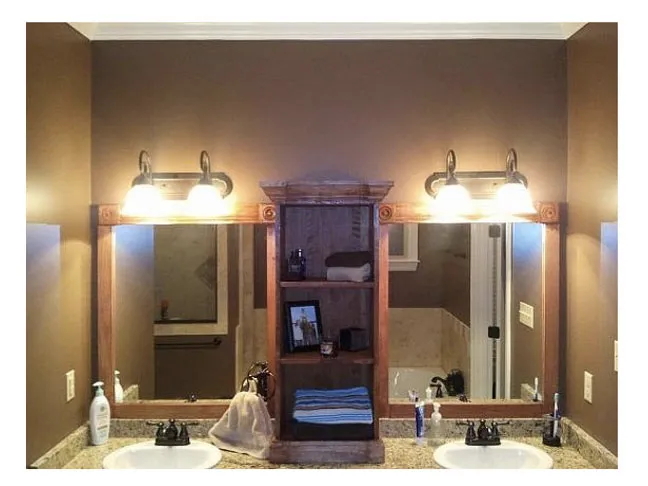
If your bathroom has a double sink, break up the monotony of one wide mirror by installing two smaller mirrors, separated by a tall cabinet.
Get more photos and tips from Hometalk.
Photo: Hometalk
-
Chrysanthemum Mirror
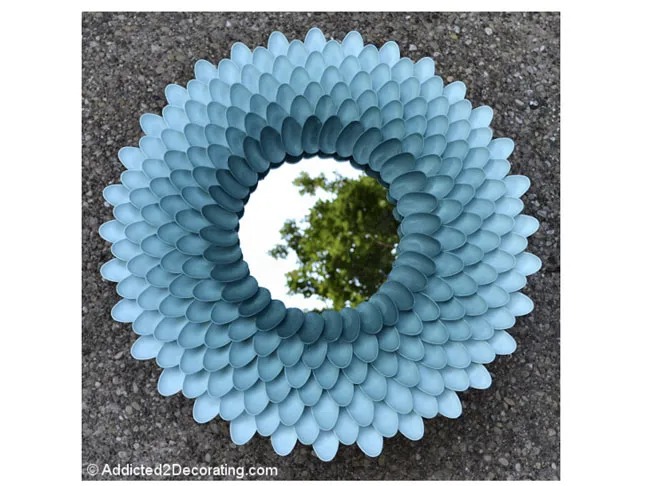
This stunning chrysanthemum mirror is eye-catching and colorful, and a great accent for any room in the house—and you'll never guess what it's made from.
Get the DIY tutorial from Addicted 2 Decorating.
Photo: Addicted 2 Decorating
-
Rustic Marble Tiled Mirror
A simple line of marble along a bathroom mirror can instantly give it texture, style, and old-world charm.
Get the DIY tutorial from The Sits Girls.
Photo: The Sits Girls