
Fusilli aren’t silly at all as a pasta shape; in fact they are quite serious. That is, serious about providing all sorts of nooks and crannies for sauce to nestle into, making for a seriously nuanced plate of pasta. I’ve found that with fusilli in particular, a generous pour of my preferred Italian red wine, Gattinara, helps me to channel just the right mindset. They’re one of my favorite shapes to showcase one color on one side and a different color on another, because two tones amplify the retro telephone-cord look.
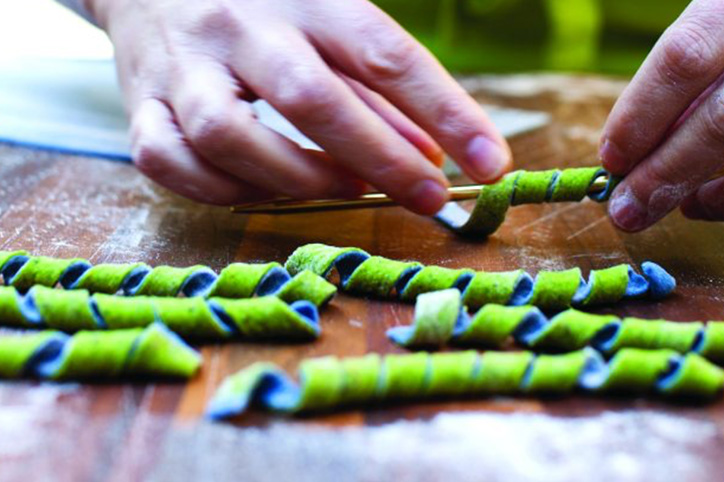
You’ll need either a knitting needle or a metal kebab skewer. The diameter will determine the width of your fusilli tendrils. Feel free to use any size needle up to about 1/3 inch, as any larger might be hard to manage. If you have a wooden needle/skewer lying around, it will certainly work, but if you’re able, use metal, as the pasta won’t stick to it as with wood, and it will make things slightly easier. If the skewer/needle has an endcap that is larger than the cylinder, just roll your fusilli with that end hanging off the edge of the surface so it doesn’t affect the needle’s ability to roll evenly across the surface.
The first time you make fusilli, start with the suggested amount of dough in the recipe, which is quarter batches of each color; if you try to make more, chances are your dough will dry out before you finish rolling this unique shape. As written, this will make two servings of pasta. If you want to scale up eventually, I still recommend working with a total of a half batch of dough at a time and sheeting new dough as you want more. This will prevent you from having an unmalleable sheet of dried-out pasta.

BICOLORED FUSILLI
MAKES 2 SERVINGS
1/4 batch dough (your choice of color, Butterfly Pea Flower as shown)
1/4 batch dough (your choice of color, Parsley-Pepper-Turmeric as shown)
Flour for dusting
Kosher salt
- Roll each color of dough to the third-thinnest setting on a pasta machine, taking care that the sheets are the same size as one another and as wide as your pasta machine rollers will allow. Flour the bottom of one sheet of pasta and lay it on your work surface, unfloured side up. Lay the second sheet of pasta on top of the first, doing your best to match it to the shape of the base sheet exactly. Flour the top of the second sheet. Gently roll the two sheets together, first with a rolling pin, then with a pasta machine. When the bicolored sheet is through the third-thinnest pasta machine setting, it’s ready to become fusilli.
- Using a straight rolling cutter, cut the pasta sheet crosswise into four pieces. Work with a quarter sheet of pasta at a time, keeping the remaining sheets covered with a kitchen towel to prevent drying. Cut the jagged end off your quarter sheet so that you have a pasta rectangle. Lightly flour this sheet so that it does not stick to the skewer when twisting.
- Using the same rolling cutter, cut the sheet crosswise into noodles that are 1/4 to 1/2 inch wide and 5 to 6 inches long. Work with one noodle at a time. Place a noodle on the work surface on a diagonal and wrap the near end of it around your skewer, about halfway up the needle. Position your open palm across the skewer/needle on top of where you’ve wrapped the noodle and roll away from you gently against the work surface. This will result in the noodle twisting around the skewer in a spiral.
- Gently slide the noodle off the skewer, taking care not to rip or snag it. If you notice that it wants to bond to the skewer, add a little more flour to the remaining noodles. Winding the noodles too tightly around the skewer can also result in them sticking. When you move your palm across the surface, do so with just enough pressure to get the noodle and skewer to roll. Don’t apply so much pressure that the noodle smooshes into the skewer.
- Repeat to make the remaining fusilli, taking care to give each its own space on the work surface.
- Let the fusilli rest for at least 45 minutes or up to 2 hours at room temperature before boiling. If you would like to cook them another day, after they are leathery to the touch and no longer sticky, store the pasta on a sheet pan covered with plastic wrap in the refrigerator for up to 3 days. Increase the cooking time by 1 minute if working with refrigerated pasta.
- Boil in salted water for 1 to 2 minutes, drain, dress, and serve immediately.
BUTTERFLY PEA FLOWER DOUGH
Blue
Butterfly pea flower dough is a regal shade of unmistakable blue it’s hard to believe exists in nature, and yet it does. This recipe, like many in the book, is easily tweakable. You can adjust the hue as if on a sliding scale by adding a little bit of baking soda for a blue that veers toward green or a little bit of vinegar to get a more purple dough. I would not add more than ½ teaspoon baking soda or 1 tablespoon vinegar, because you’ll throw off the taste and texture, not to mention the ratio of ingredients.
This is a water-based dough for a reason. When you mix too many yellow egg yolks with butterfly pea flowers, you’ll wind up with a muddy, unattractive green-blue.
Butterfly pea flowers can be readily sourced online—Amazon has a constantly changing selection of vendors, so I usually purchase from the one that’s most highly rated at the time of my search.
1 cup boiling water
Packed 1/2 cup dried butterfly pea flowers
2¼ cups “00” pasta flour
- Combine the boiling water and flowers in a bowl and stir to make sure all flowers are submerged. Let steep for 10 minutes, then press the steeped mixture through a strainer directly into the bowl of a standing mixer containing the flour. Depending how well you pressed the flowers, you may need to add a touch more flour to this dough, as it can be on the sticky side. You may not need quite all of the steeped liquid, but be sure to reserve any extra by pressing it into a separate liquid measuring cup in case you do.
- Fit the mixer with a paddle attachment and mix on low speed until a ball of dough forms. Continue to knead for 3 minutes, either by hand or in the mixer, so that the dough develops elasticity and silkiness. Cover the ball of dough in plastic wrap and let it rest at room temperature for 30 minutes before sheeting.
- Alternatively, you can let the dough rest for up to 24 hours in the refrigerator. The color sometimes intensifies after that, although the dough is still usable for up to 3 days.
PARSLEY-PEPPER-TURMERIC DOUGH
Speckled Chartreuse Green
I’m a big, big fan of the color chartreuse, and this dough is close to that shade, with flattering smatters of black accenting the green. It’s no accident that I included black pepper, since the active ingredient in black pepper, piperine, is said to increase the body’s absorption of the curcumin in turmeric. Health benefits aside, make this dough just once for me, pretty please, since I’m so partial to its gorgeous color.
1 tablespoon kosher salt
1 teaspoon baking soda
1 bunch fresh parsley
1 inch fresh turmeric root, peeled and chopped; or 1/2 teaspoon ground turmeric
1/2 teaspoon freshly ground black pepper
2 large eggs
2¼ cups “00” pasta flour
- In a large saucepan over high heat, bring the salt, baking soda, and 8 cups water to a boil. Add the parsley and blanch it for 15 seconds. Drain and press out the water.
- Add the parsley to a blender and wait 1 or 2 minutes for it to cool. Add the turmeric, pepper, and eggs and blend on low speed at first to combine, then increase the speed and puree until smooth.
- Strain the puree with a fine-mesh sieve over a small bowl to remove and discard any grainy threads.
- In the bowl of a standing mixer fitted with a paddle attachment, combine the flour and puree. Mix on low speed until a ball of dough forms. Continue to knead for 3 minutes, either by hand or in the mixer, so that the dough develops elasticity and silkiness. Cover the ball of dough in plastic wrap and let it rest at room temperature for 30 minutes before sheeting.
- Alternatively, you can let the dough rest for up to 24 hours in the refrigerator. The color sometimes intensifies after that, although the dough is still usable for up to 3 days.