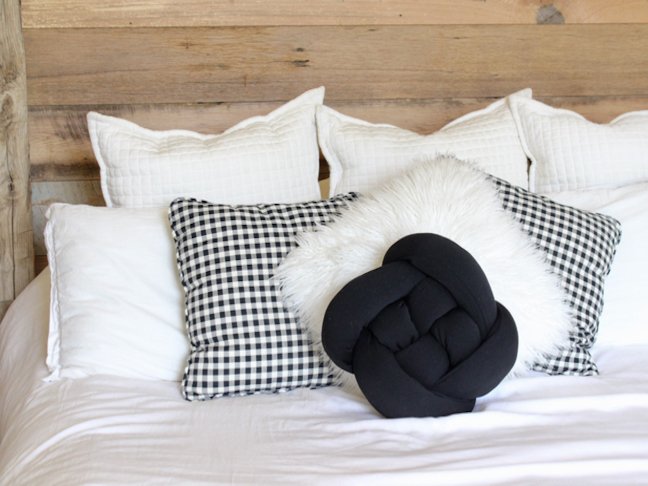

I need a pillow that says, “One can never have too many pillows”! I have lumber pillows, throw pillows, square pillows, round pillows, fur pillows, solid pillows and patterned pillows. Never have I ever had a knot pillow, until now. Stylish and surprisingly comfortable, the knot pillow adds a pop of modern style to any couch or bedroom.
I’ve seen the DIY knot pillow trend on Pinterest, and the expensive store ones for sale, too. Now, I believe most anything can be made into a DIY version, but at first glance, I was intimidated and skeptical about the idea of making a DIY knot pillow. In fact, my stomach was in knots (pun intended) wondering how I was going to make the pillow without a sewing machine. Plus, how the heck do you actually create the knots? Well, I figured it out, and it was a rather simple process. I skipped the sewing machine part (because I’m a firm believer in no-sewing machine everything), and went straight for the women’s tights. Yup, tights.I love me some Spanx, but basic, cheap ones are all you need for this DIY. The only lumps and bumps you need to hide are from the stuffing, not your thighs!
You KNOW you want to make your own DIY knot pillow. Here’s how:
Materials:
- 2 pairs of women’s tights (non-sheer) or leggings
- Needle and thread
- Poly-Fil Polyester Bag
- Clothing pins or pins
Directions:


Step 1: If you are using leggings, use a needle and thread to sew the bottoms of the leggings completely closed. It’s easier to use tights, so if you are using sturdy tights, skip this step.


Step 2: Fill the tights with stuffing.


Step 3: Roll the waist of the tights close to the inseam. Thread a needle and sew it in place. Weave in and out of the fabric – I made wider stitches on this step to move along quicker.

Step 4: Lay the leggings on top of each other, like a cross.


Step 5: Begin to make the first knot. It’s easier to show the knot tutorial with rope, so follow the arrows on the steps in the photos above. If you do it correctly, it should look like the photo above. Play with the knot to make it look as tight or lose as you want. Make sure you have enough legging left over to tie another knot.


Step 6: Begin to fold the second knot. I followed the same pattern for the first knot and the second knot, just switched directions.


Step 7: There will be a little excess material after you tie the second knot, so find spots on the back of the pillow to tuck the excess into. Make sure you look at the front of the pillow to make sure the ends are not visible, or if you want them to be visible, they are strategically placed. Use a pin or clothing pin to keep them in place. Once in place, thread a needle, and hand sew them. It’s a simple in and out process with the needle and thread until it’s sewn, and then don’t forget to tie a triple knot at the end.
Step 8: Find a home for your new ultra-plush pillow.


