

Back-to-school is one of the best times of the year! Fresh binders, sharpened pencils, and the promise of an exciting year ahead always get me totally pumped, whether or not I’m actually the one headed back to school. My favorite thing used to be choosing a pencil box — you had to find just the right balance of form and function, right? Now, as a mom, I like to help my kids get a little crafty with their back-to-school supplies, so we upgraded a simple pencil box with some easy, “why-didn’t-I-think-of-this-sooner” DIY hacks! Just a few steps make a plain chipboard pencil box into a totally custom storage spot for all of their odds and ends.
This is a project that you can definitely get the kids in on. Have them help choose the supplies for decorating the top of the case — you can use their favorite colors in vinyl, fabric, paper, or more. Little ones can decorate with stickers or bigger kids can add their own art or mixed media. The sky is pretty much the limit, so help them get creative!
Here’s how to DIY a pencil box just in time for back-to-school!
Supplies:
- chipboard pencil box
- extra chipboard or cardboard
- craft paint
- paintbrush
- glue gun
- ruler
- pencil
- materials for decorating the lid (vinyl, fabric, paint, stickers, puff paint, sequins, pompoms, and so much more!)

Step 1: Start by measuring the interior of your box. Cut three pieces of chipboard. One should be the length and height of the box, measuring from the inside of the box walls. The other two should be the same height as the box, but half the width. Use your ruler and pencil to draw these dimensions on your chipboard, and cut out the pieces with scissors.

Step 2: Paint the chipboard the same color as the interior of your pencil box. Chipboard soaks paint in nicely, so you shouldn’t have to wait too long for the pieces to dry. Make sure you paint both sides and all edges as well.

Step 3: Start glueing in the pieces of chipboard. You’ll start with the two shorter pieces. Make two light marks on the inside of one of the long sides of your pencil box, separating it into three equal sections. This is where you’ll glue the two short pieces. Place a line of hot glue along one side and the bottom of each piece of chipboard as you glue them into place.

Step 4: Now glue in the long piece of chipboard. Place glue along the sides and bottom, inserting it snugly up against the two smaller pieces. You should now have created four separate compartments within your pencil box. If you’d like to add a little glue between the short and long pieces of chipboard to make it extra sturdy, you can do that too!

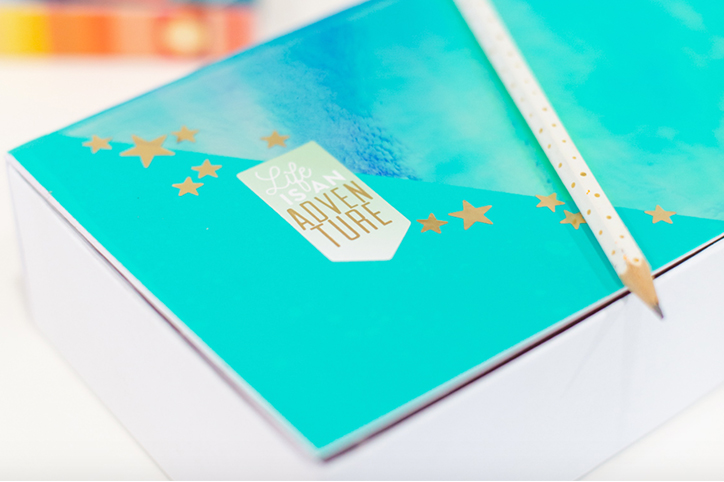
Step 5: Now let’s decorate the top! If you’d like to make a lid like ours, use holographic vinyl and cut it to the size of the lid. Smooth the vinyl down over the entirety of the lid. Then, for an accent, use another shade of vinyl to add another layer of color on a portion of the box.


Step 6: Finally, add some stickers! Scrapbooking stickers are a great choice for finding fun, inspiring phrases and designs. If you want to go a different direction entirely, play with paints, glitter glue, or just about anything else you can think of to customize your kiddo’s pencil box.

Step 7: Fill the compartments with everything they’ll need for a happy and successful school year!