I love making handmade baby gifts; they’re so much more thoughtful and personal than store-bought presents. This simple onesie is a fantastic, sweet present you can make for a little friend. Best of all, it’s an easy DIY even the most craft-challenged can handle!

Supplies:
- 1 plain white onesie
- printed out letter shape (use the first intial of the gift-recipient’s name)
- freezer paper
- exacto knife
- tape
- paper plate
- 1 paint brush (a foam brush is best)
- fabric paint
- scissors
- scotch tape
- cutting board
Instructions:
Step 1: Make your letter stencil. Don’t worry! There’s no real designing involved; simply fire up your computer and use whatever writing program you typically use (like Microsoft Word or any other writing tool) to magnify a letter. If you don’t have an editing program, you can find an image online to print out. The size of your letter depends on the size of the onesie. Choose a size so that the letter covers the front of the onesie. Print out the letter.

Step 2: Tape a piece of freezer paper to your cutting board and then place the printed out letter on top of the freezer paper. Tape it all securely so the paper won’t shift when you cut.
Step 3: Using your exacto knife, cut out your letter.


Step 5: For a letter like “O,” you’ll need to cut out the inner circle as well.

Step 4: Throw away the printer paper, and keep the freezer paper letter stencil.
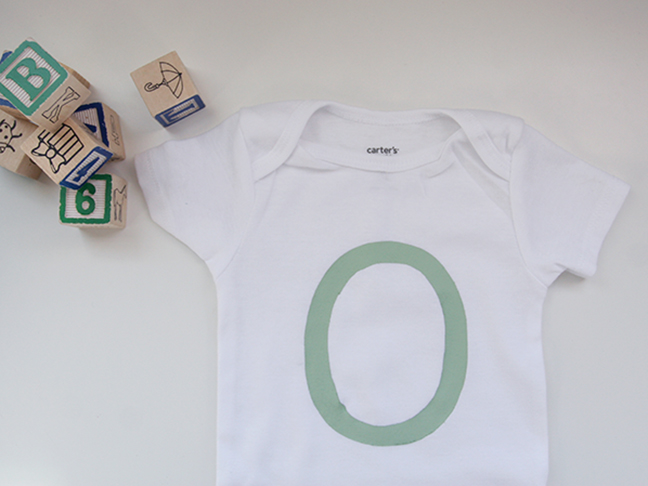
Step 5: Iron the freezer paper letter stencil onto the onesie. For a letter like “O” (or “A” or “B” and so on) you have to iron multiple pieces of the stencil onto the onsesie. I ironed on two separate pieces for “O” as you see below. When placing your stencil, find the exact center of the onesie by folding the onesie in half and ironing the seam, so you can see it. Then unfold the onesie, and voila! That’s the center. If your letter stencil has more than one piece, remember to iron on the outside of your letter stencil before you do the inside.

Step 7: Dump some fabric paitn onto your paper plate.
Step 8: Use your paint brush to apply the paint. It’s a good idea to put another piece of paper between the layers of the onesie so the paint doens’t bleed onto the other side of the garment. Use a nice foam brush to gently apply the paint to the O shape. You’ll probably need another coat.

Step 9: Let the paint dry completely and then pull off the freezer paper and you’ve got a cute onesie to give as a gift!


