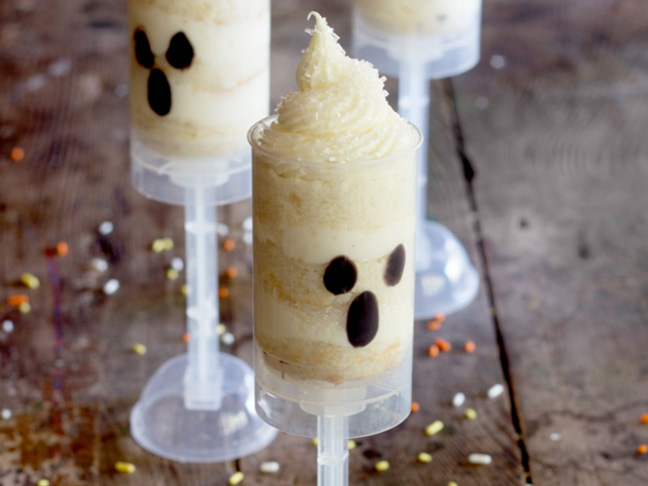

I am obsessed with finding new ways to up the awesome factor at parties without having to splurge on decorations you may never use again is to spiffy up the presentation of your food. These DIY ghost cake pops are a perfect way to add “WOW” while being kid friendly: Halloween really is all about the kids, after all. It also doesn’t take a whole lot of artistic skill! All you need is a steady piping hand and you’re all set.
Supplies:
- push-up pop containers
- black candy melts
- small microwaveable bowl
- toothpick
- white cake mix or your favorite white cake recipe
- white canned frosting or your favorite white frosting recipe
- cake leveler
- circle cookie cutter at same diameter as push-up pop containers (usually approximately 1.5 – 1.75″)
- piping tip of your choice and piping bag
- clear sanding sugar
Instructions:
Step 1: Bake a your white cake in two separate 8″ square pans. Set aside to color thoroughly before assembling. Baking tips: Use only egg whites in your cake, as yolks will tint the cake too yellow and the final pop will no longer look like a ghost. Use the toothpick method rather than the recommended time on the box or recipe, and then remove immediately when cooked through to avoid over browning.

Step 2: While you are waiting for your cake to cool, draw the ghosts’ faces on the barrels of the push-up pop containers. In a small microwaveable bowl, heat candy melts as described on the packaging until they are fully melted. With a toothpick, paint an oval mouth and two smaller oval eyes onto the push pop container by dabbing a bit of the melted candies onto the interior surface. The ovals do not need to be perfect; you’re drawing a spooky ghost face, so a little bit of wiggle is fine! If you make a mistake, quickly clean it up with a clean toothpick and, if needed, a little bit of water. Set the completed pops aside to cool and set. If they are not already assembled, gently insert the push-up stick into the container to get them ready for assembly.
Step 3: When the cake has completely cooled, level the top of the cake so the top surface is flat. With your cookie cutter, punch out circles of cake and set them aside in preparation for assembly. Tip: Use the cake scraps for cake pops later!
Step 4: Fit a piping bag with the piping tip of your choice, and then fill the bag with frosting. Push any air out of the bag, then set it aside for assembly.

Step 5: Gently push a cake circle into the bottom of the push-up pop container, making sure the layer sits level. Pipe frosting on top of the cake layer in a circular motion, starting on the outside and working your way in, until the cake circle is covered. Sprinkle a small bit of sanding sugar on top of the frosting layer to add a little sparkle, and repeat until you’ve added the third cake layer to the container.
Step 6: After inserting the third cake layer, pipe frosting on top of it so it peaks rather than forming a flush layer (as you had done previously). Finish the top with a little extra sanding sugar, and serve!
Photos by Maddy of Splendid Supply Co. for Momtastic
More DIY Halloween Treats: