The Spider Cakes in this recipe are colored purple, to make them fun and not scary for the younger crowd. You can make them all black, and add a scarier mouth if you prefer something spookier.
Supplies:
- 1 box cake mix or recipe (and accompanying ingredients)
- Wilton Mini Wonder Mold cake pan or another ball shaped mini cake pan
- icing (about 2 cups)
- round decorator tip
- pastry bag
- food coloring (purple or black)
- 11×17-inch cake board (or piece of cardboard)
- aluminum foil
- scissors
- tape
- black string licorice
- red fruit gummy candies
- small round candies (like M&Ms or Reese’s Pieces)
- white melting candies
Instructions:
Step 1: Preheat the oven and mix up the cake according to the box or recipe directions. Spray the cake pan with flour cooking spray to keep the cakes from cooking once they’re baked.
Step 2: Fill each cavity about 3/4 full with batter. You should get about 6 mini cakes from one cake mix.

Step 3: Bake the cakes according to the directions for cupcakes (usually at about 350`F for about 20-22 minutes). Check the mini cakes to see if they’re done, they may take an additional couple minutes. You know the cakes are done when a toothpick inserted into the center comes out clean.
Step 4: When the cakes are baked, use a serrated knife to level the tops.

Step 5: Once the tops are cut off, loosen the cakes gently and turn them out onto a cooling rack to cool.

Step 6: While the cakes are cooling wrap your cake board (or a piece of cardboard, or a cookie sheet) with decorator foil or aluminum foil. Tape the edges of the wrap to the bottom of the board.

Step 7: Mix up a batch of your favorite decorator icing, and color it with the purple food coloring until it reaches the desired shade. You can also make your spiders black with black food coloring, if you prefer.

Step 8: Put the cooled cakes on the board, with a dollop of icing underneath to hold them in place.

Step 9: Ice the mini cakes with the purple decorator icing.

Step 10: Let the iced cake sit for several minutes so the outside of the icing starts to dry. Use a square of parchment or wax paper to smooth out the icing; simply press lightly with your fingers over the paper along the edge of the cakes. If the icing sticks to the paper, let the icing dry for a few more minutes.

Step 11: Drop the round decorator tip into a pastry bag, and fill the bag about 1/3 full of icing.
Step 12: Use the pastry bag to drop 1/2 inch dollops of icing on each side of each cake (add 4 dollops to each side) for the spiders feet. Space the dollops about 1-inch out from the cakes.

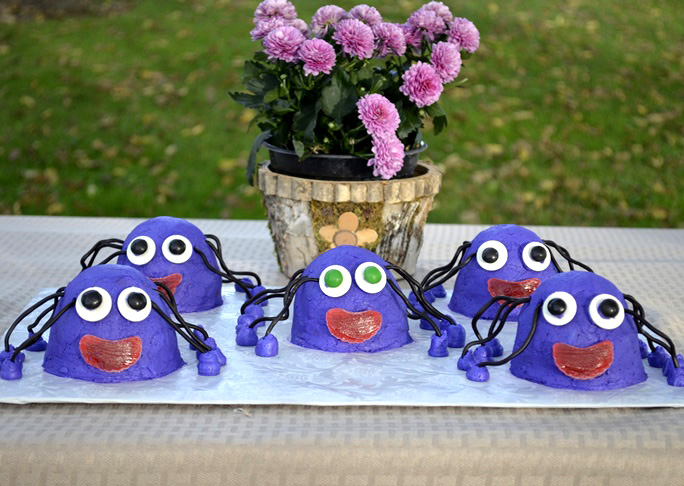
Step 13: Cut pieces of black string licorice (each piece should be about about 3-inches long) for the spider’s legs. Cut 8 legs for each spider. Insert one end of the licorice into the side of the cake, and the other end into the spiders foot, as shown below:

Step 14: Allocate 2 pieces of white melting chocolate for each spier. These will be the spider’s eyes. Put a small dollop of icing on the rounded side of each piece of white melting chocolate to serve as a glue. Press the white chocolate pieces to the front of each cake (about 1/4 to 1/3 of the way from the top) for the spiders eyes.

Step 15: Put a small dollop of icing on one side of small round colored candies (the M&M’s or the Reese’s Pieces). Then, stick the candies to the centers of the eyes.

Step 16: Slice red fruit candies for the spiders mouth, then put a small amount of icing on the back and press it in place.


Step 17: Clean up any excess icing from your cake board and you’re ready to display your spiders!
Want more Halloween Recipes?
- Frankenstein Cake Recipe
- Good Witch Mini Cakes Recipe
- Spider Brownies Recipe
- Marshamallow Rice Bar Ghosts Recipe
- Spider Deviled Eggs Recipe
- Oreo Truffle Eyeballs Recipe
- Melted Candy Bar Hot Chocolate Recipe
- 5 Last-Minute Halloween Treats
Linette Gerlach blogs at www.linettegerlach.com.