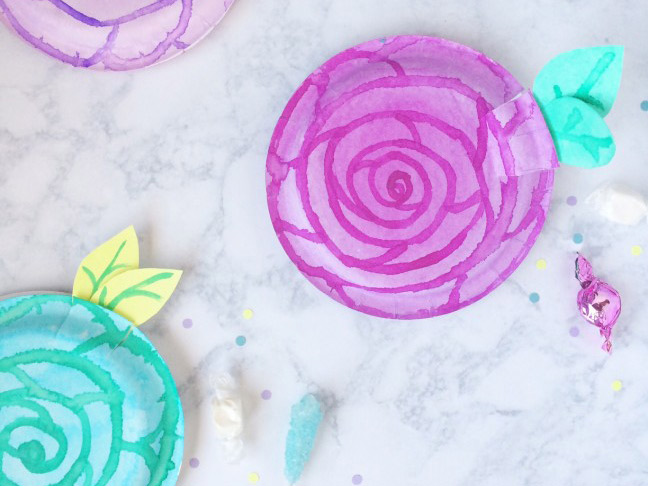

Spring is on the way, and in my opinion, it can’t come fast enough. The kids and I are getting a jump on the season with some colorful crafts. Ever since I made this DIY paper plate backdrop, I’ve been thinking of other fun ways to incorporate these everyday items into fun projects. These DIY watercolor paper flower favor boxes are so simple that even a child can make them. Seriously. A kid can make them. I love a pretty peony or ranunculus, and their layers upon layers of petals inspired these inexpensive candy containers.
Use them for thank you gifts or “just because” surprises this spring. I have a feeling a few of them will show up in the mailboxes of several of kiddo’s neighborhood friends.


Supplies:
- 7″ heavy duty paper plates
- wide paintbrush
- thin paintbrush
- watercolors
- small dish of water for rinsing brushes
- heavy duty scissors
- hot glue or school glue
- candy or small toys
Instructions:
Step 1: Using a wet, wide brush, paint the back of two paper plates with the color you like for the flower petals. Set aside to dry. Rinse brush.
Step 2: Create a thin spiraling line starting at the center of one of the plates using a slightly damp, narrow paintbrush. You can choose the same color as the petals, or a contrasting hue. The color of these lines will stand out against the background to create the petals’ shape.
Step 3: Once you’ve completed the spiral pattern, add short curved lines from row to row to break up the long, winding lines. Paint the curve of the connecting lines in the same circular direction as the overall spiral pattern, either clockwise or counterclockwise. Set aside to dry.
Step 4: Paint the back of another plate green using the wide paintbrush. Allow to dry.
Step 5: Cut 3″ x 2″ pointed oval shapes from the plate, and paint darker green leaf veins on each one. Set aside.
Step 6: Cut two 2″ slits into the edge of the floral plate about 3″ apart. Fold the newly created flap toward the center of the plate to create a crease.
Step 7: Glue the two flower plates together with both painted sides visible. Do NOT glue the little flap to the other plate. Allow to dry.
Step 8: Fill the box with small toys and treats, and glue leaves to the underside of the hatch door to fill the favor box. If you’d like to add larger treats, cut a slightly larger trapdoor.
pics by Shauna Younge of Sweet Tooth
More DIY Spring Party Decor: