As of mom of three young kids who are always knee-deep in dirt and paint, I need bleach to get stains out of their clothes. I have never used bleach at the art table, until now. With fabric as my canvas, and a bleach pen, I created DIY labels for refreshing fruit infused water. Anyone can do this project in less than thirty minutes. Gotta love that!
Supplies:
- Clorox Bleach Pen
- 4×4 squares of fabric (Try to find fabric that matches the color of the fruit inside the water.)
- Cardboard
- Small mason jars
- Fruit
Instructions:
Step 1: Cut out 4×4 squares of the fabric.

Step 2: Protect the surface you’re working on with cardboard wrapped with wax paper.
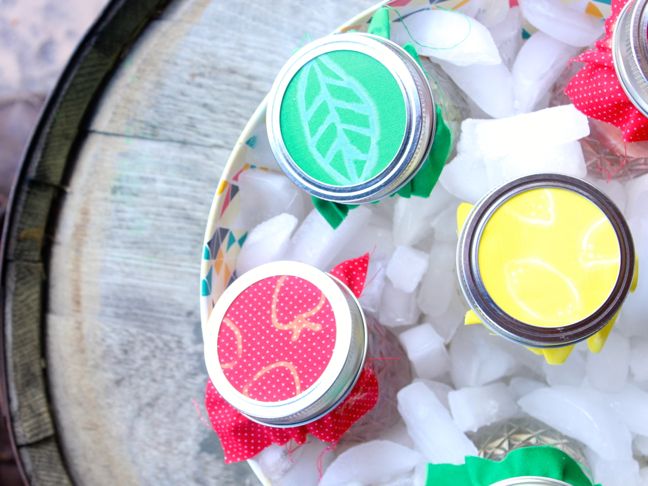
Step 3: Draw shapes of the fruit on the fabric. Try to press the Clorox pen with a fair, consistent amount of pressure—you don’t want the lines to be too thick or too thin. If you need to pencil it in before drawing, do it with chalk. For the strawberry-infused water, I drew little strawberries on the red polka dot fabric. For the mint-infused water, I drew small and large mint leaves. For the lemon-infused water, I drew whole lemons.


Step 4: Wait about 5–10 minutes (the time will vary depending on your fabric) before washing your fabric squares. You can do a sample on your fabric before you begin to determine how long to set your timer. To make sure the bleach is working, you will see “whiter” sides along the outer edge of the shape outlines. Another way to see if the bleach has made its mark is to lift your fabric to look at the back side of it. You should see a “bleached through” color on the back of the fabric.

Step 5: Rinse the fabric with water, then wash off all bleach residue with a small amount of soap and water.
Step 6: Set to the side to dry.

Step 7: Cut up fruit. Add water, fruit, and ice to your mason jars.
Step 8: Place the square on the top of the mason jar, and screw the outer rim onto the jar.


Step 9: Pack the fruit-infused water for an easy-to-transfer picnic beverage. Cheers!
More Mason Jar DIY Crafts: