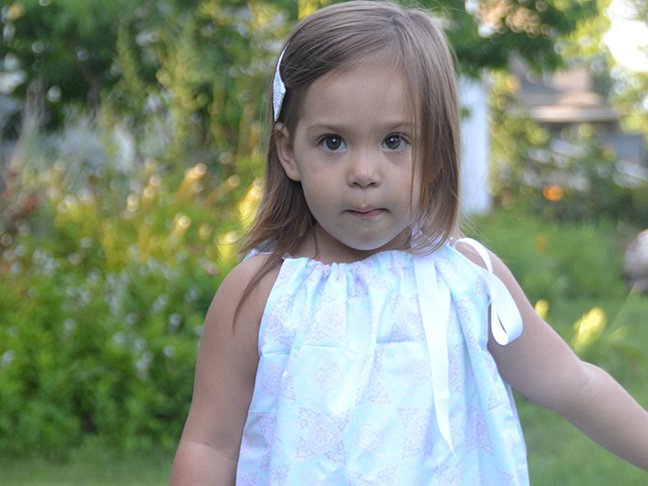
I’ll admit it: I’m not quite as crafty as I want to be. One of these days I’ll dust off my sister-in-law’s extra sewing machine she so graciously lent me three years ago, turn on YouTube, and teach myself how to sew. But until that day comes, I have to find easy work-arounds for the cute things I want to make for my two little girls. Enter the pillowcase dress for little girls!
Most of the tutorials I found involved affixing two bandanas or pieces of fabric together; I wanted to use an actual pillowcase because I love that large, natural hem created by the open end of a pillow case. Sometimes you can even find one where that bottom bit has a different pattern, making it look extra cool on a little dress.
Many of the tutorials floating around on Pinterest were also for pillowcase dresses you can make without sewing, but I didn’t love any of them. A few even beckoned me in calling themselves “no-sew” until I read down a few lines and figured out they meant no sewing machine; stitches still needed to happen. Nope! So, I used a bit of advice from a few and made up the rest to create the easiest no-sew pillowcase dress (or top for bigger girls!) ever.
Want to make your own no-sew pillowcase dress? Follow my simple instructions below:

")
Supplies:
- A pillowcase
- Scissors
- Iron-on hem tape (get this one)
- Tape measure or ruler
- Grosgrain ribbon (5/8″ – 7/8″ works best)
- Safety pins
Seriously, that’s it. You don’t see a needle and thread for a reason.
Instructions:
Step 1: Cut off the top (sewn) end of your pillowcase. How far down you choose to cut will depend on the size of your child. For reference, I lay a dress of similar shape that fits my daughter well next to the pillowcase, so I could gauge proper length and approximate arm hole size as well.
")
Using a standard pillowcase to make a roomy dress on a girl who wears a size 3T, I cut my pillowcase 4 inches down from the top sewn end; for a 4-5T dress or a top that fits a girls’ 6-7, go closer to 6 inches. Use your existing garment as the best guide, though.
")
Step 2: Cut the armholes. This is a tad trickier than step one because it will vary a lot based on the girl, but start by cutting the pillowcase along the side seams down far enough to where it will lie comfortably beneath her armpit. Again, referencing a dress that fits her well side-by-side should help you decide. For my girl in a 3T, I cut down about 4 1/2 inches.
")
Step 3: Complete the armholes. Fold one corner inward creating a triangle; iron in place to create a diagonal crease. Then, cut a piece of hem tape the exact length of the hem, place the hem tape against the crease, bring the flap back downward, and iron slowly in place. Repeat on all four corners.

Step 4: Make the neckline casing. Once you’ve mastered the armholes, this is nothing. Simply fold the top of the pillowcase down leaving enough room for the ribbon to fit through comfortably, and for your hem tape to run along the bottom. I used 5/8″ on my 3T dress and folded down 1 1/4″. For a 5T and larger, go with 7/8″ ribbon and fold down about 2 inches.
Using the same method you did for the armholes, iron your crease, fold back, place hem tape, fold over, and press slowly and firmly with iron to seal your seam. Repeat on back side.
")
Step 5: Finish up! Affix a safety pin to your ribbon and slowly guide it through the hole you’ve created in the neckline, leaving enough slack on the first side to fit over your little girl’s shoulder. Once you’re back at the beginning, eyeball how much you’ll need to create a proper bow on that side, cut the ribbon, and you’re done.
")
Optional: You can reinforce the ends of your ribbon to prevent fraying with either use a lighter on the very tip to seal, or a touch of hot glue. I tend to cut mine at an extreme angle which holds up well enough without sealant, but enforcing is never a bad idea!
")
Like what you see? Don’t forget to Pin it!