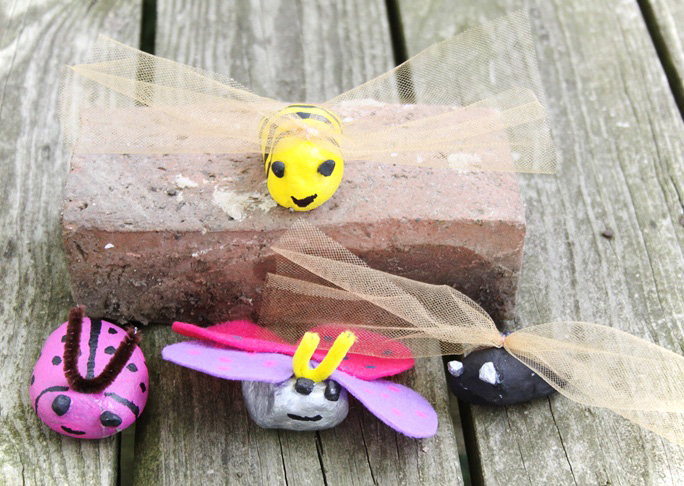

Summer’s here, and it’s time to to head outdoors for some sun and fun! This painted rock bugs outdoor craft provides hours of entertainment right in your own backyard. Just gather up some smooth rounded rocks, about 1 to 2 inches long, and let the kids paint them and decorate them like their favorite creepy crawly bugs.
Materials:
- 4 1-to-2-inch smooth rounded rocks
- 8 smaller 1/4-inch pebbles
- black craft paint
- red or pink craft paint
- purple craft paint
- silver metallic paint
- yellow pipe cleaner
- brown or black pipe cleaner
- 2 pieces of 6 x 8 inch gold tulle
- black paint marker
- blue paint marker
- pink paint marker
- butterfly wing pattern (download the PDF for free here)
- 1 piece pink felt
- 1 piece purple felt
- glue
Instructions:
Step 1: Find 4 smooth rounded rocks about 1/2 an inch in size, and 8 smaller 1/4 inch pebbles. You can find rounded rocks around lakes and creek beds where water has flowed over them and worn them smooth. You can also sometimes find rounded rocks in your own driveway.
Step 2: Paint the rocks. Paint one rock black to make a fly, and paint one rock pink or red for a ladybug. Paint one rock silver for a butterfly, and paint one rock yellow for a bee. Set the painted rocks aside to dry.
Step 3: Paint 6 of the the 1/4-inch pebbles black for the bugs’ eyes. Paint the other two 1/4-inch pebbles silver for the fly’s eyes. Set the rocks aside to dry.
Step 4: Once the paint has dried on the rocks, glue the eyes to the side of the rock you want to make the front of the bug. Glue black eyes on all the bugs, except the fly. Glue the silver eyes on the black fly. Set the bugs aside to let the glue dry.

Step 5: While the glue is drying, cut out the butterfly’s wings. Print out the butterfly wing pattern, and cut it out. Cut two wings from the pink felt, and two wings from the purple felt.
Step 6: Use a blue paint marker to put polka dots on the pink wings, and a pink paint marker to put pink polka dots on the purple wings. Before you add the dots, make sure the wings are turned so you will have a left and right wing when you add them to your butterfly.

Step 7: Cut a 3-inch piece of yellow pipe cleaner, and a 3-inch piece of brown or black pipe cleaner.
Step 8: Fold the yellow pipe cleaner in half and glue it just behind the butterfly’s eyes for the antennae. If the pipe cleaner won’t stay in place, place a pen in the center to hold it in place until it is dry.


Step 9: Fold the brown pipe cleaner in half and glue it just behind the ladybug’s eyes for the antennae. Use a pen in the center to hold it in place until the glue dries.
Step 10: Glue the butterfly’s wings to the center of its back, so one pink and one purple wing is on each side, and set it aside to dry.


Step 11: Use a black paint marker to paint black stripes around the bee.

Step 12: Use the same black paint marker to mark a line around the ladybug’s head and a stripe down her back to make the wings. Add black polka dots to her body.


Step 13: Cut 2 pieces of gold tulle 6 x 8 inches. Tie a small piece of string around the center of each piece, pull it tight, and knot it to gather the center together.

Step 14: Glue one piece of tulle where the string is to the center back of the fly. Glue the other piece of tulle to the center back of the bee for wings.

Step 15: You can let each child make one bug, or put together the whole set to save for fun summer memories!
More Kid Craft Projects:


