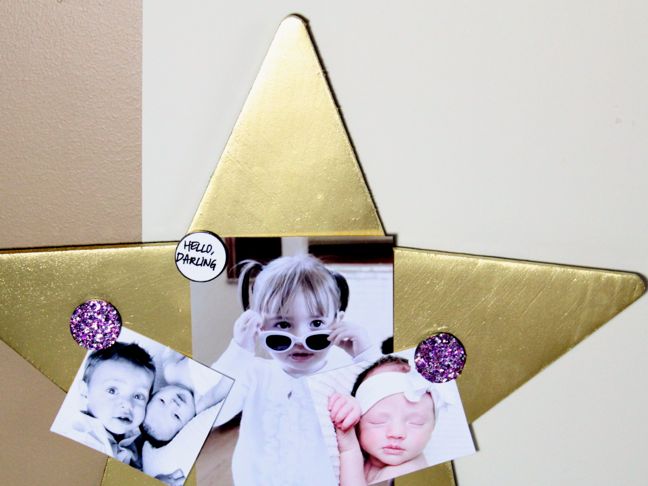

I love a good DIY, especially when it’s gold. I made a some DIY gold star magnets for my daughter’s room similar to these Pottery Barn PB Teen Emily + Meritt Gold Star Magnets. These magnetic gold stars are not only a beautiful piece of room décor, but they are also practical because my daughter can hang photos, notes, and special memorabilia from it. While my daughter loves this star shape, you can turn any piece of wood into a DIY magnetic board with this easy tutorial.
RELATED: DIY Painted Bulletin Boards
Supplies:
- Star (Most of the metal ones I found were 3D, so I opted for a flat wooden star. Here’s another wood option.)
- Magnetic paint, Home Depot
- Gold metallic spray paint
- Sandpaper or orbital sander
- Magnets
- Foam paintbrush
- Gloves
Instructions:
Step 1: I purchased the hollow star from JO-ANN Fabrics, and it had a rough texture. I wanted the surface of my star to be smooth, so I put on my onion goggles for eye protection and used my orbital sander to sand the surface until smooth. It took about three minutes of sanding. Wipe off the excess sand.

Step 2: Put on gloves and stir the magnetic paint until smooth. (It’s heavy to stir, so be sure to stir it well so it works well.)
Step 3: Paint the star with magnetic paint. I did four coats of the magnetic paint, with thirty minutes between each coat. The paint is a deep charcoal color. Wait four hours to spray the spray paint color.
Step 4: Spray the star with gold spray paint. The more coats of gold paint, the less magnetic the star will be, so I did two light coats and the magnets work great.

Step 5: Hang with Command strips, and choose cute photos, tickets, or notes to hang from the star.


More Ideas for Kids’ Bedrooms: