I recently turned my office into a shared office and art space for my four-year-old son. It has not only provided him with a space to create, it has fostered his creativity. He wants to sit down and draw and color and “be an artist” now that he has a space to do it. I think having his supplies within reach and having a place to display his creations has really helped him enjoy it more. And it gives me a much needed break from the constant entertaining. So I thought I would share some tips for how to create an art space for your kids.

1. Give them a place to sit that is all their own.
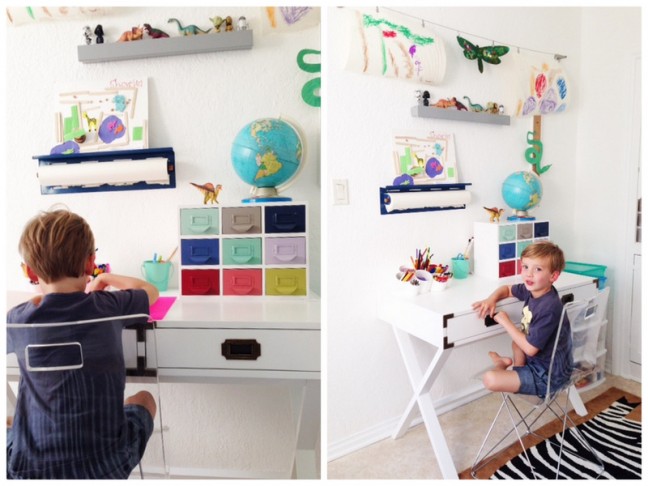
I used to sit Charlie at our kitchen table when he wanted to color. And he almost never seemed interested. I don’t know if it was because it was where he sits to eat, or if the idea just didn’t seem like that much fun. But now that he has a desk and chair that are his in a space that is designated for creativity, he absolutely loves to paint and draw. Because I was working with such a small space, I wanted to work with clean and simple furniture. These white campaign desks were perfect because they create uniformity and anchor the room along the walls, while the acrylic desk chairs basically disappear—giving the room a bigger feel. Plus, they’re so cool.

2. Keep their art supplies easily accessible.
Keeping everything in reach makes it easier for little ones to create art on their own and be more independent. This wouldn’t work for a two year old that still draws on the walls and needs more supervision, but for a four year old (or older) it’s perfect. That wall paper holder is key—it keeps paper easily accessible for him, is out of the way being on the wall, and has a shelf on top for displaying special projects. I also love the cubby cups for storing all of his colorful art supplies (which can also be hung on the wall if you want more desk space). But my favorite detail is the color reference drawers. They add fun pops of color and a retro “card catalog” feel that I love, and I don’t know a kid that doesn’t love little drawers to hide their treasures.

3. Make it colorful.
Color is fun and interesting to kids (and adults!). It also fosters creativity. By adding color in the decor, the arrangement of art supplies, or other fun little details in the room, you help to spark the fun and creativity. And it makes for a cheerful and happy room as well. Get creative in the art supplies you provide them with too. I organized ours by color and added fun things like washi tape, feathers, and pipe cleaners to help them think outside the box when it comes to projects.

4. Create a way for them to display their masterpieces.
Giving your kids a place to display their art makes them excited to create it and proud of their work. I rotate my son’s art every few days and let him pick new pieces to display on the wall. I also put up his favorite pieces that he brings home from school, and store the other special pieces in colorful plastic bins. I utilize the shelf on top of the paper holder for heavier pieces and a cork board as well, both from The Land of Nod. But my favorite way to display his art is this DIY hanging art display. It’s an IKEA hack using their Dignitet curtain wire.
Supplies:
- Dignitet curtain wire from IKEA
- wire cutters
- drill and bits
- measuring tape
- level
- curtain hooks with clips from IKEA
- allen wrench (One comes with the Dignitet, so be sure not to misplace it.)
Instructions:
Step 1: Measure and mark with a pencil where you want the ends of the art display to go. Use your measuring tape and level to make sure it is straight.
Step 2: Measure the length between the two ends with a measuring tape, then measure out that much of the Dignitet wire so you know where to cut.
Step 3: Using your wire cutters, cut the length of the wire to match your display area.
Step 4: Hang your Dignitet, following the instructions that come with it from IKEA.
Step 5: Add clips and display your art!
Note: Cutting the wire can be a little bit tricky if you’ve never done it before. Try not to let your ends separate or it becomes hard to insert them into the mounting pieces that hold the wire to the wall. This project took me one or two hours to do (I was a first-timer dealing with wire), so it was a little bit of a chore but only cost $13 and really makes the room.

The biggest lesson I learned by creating this art space for my son was “if you build it, they will come.” Once he had an art room, he loved sitting and creating! He spends lots of time here now. You can see the full room tour and source list for everything you see in the room over on my blog, Oh Lovely Day, here. You can also see the coordinating chalkboard wall I created for him, along with full DIY instructions, here.
More Spaces for Kids: