
If you love making crafts with your kids, this is a fun DIY project you should tackle together. Best of all, once you’re done, your child is left with a cool piece of art she can hang in her room or on her door. If you’re looking for your next indoor activity, read on to learn how to make this cool arts and crafts piece.

Supplies:
- 81/2 inch x 11 inch foam board (I found one at the dollar store)
- 8 1/2 inch x 11 inch sheet of printer paper featuring a large computer generated letter ( I used New Times Roman font in 700 pixels)
- buttons
- white glue
- glue stick
- paper hole punch
- 12 inch ribbon
- pencil
- little beads (optional; these may be uses as fillers, if you like)
Instructions:
Step 1: If you kid knows her way around a computer, have her create a large letter (try using her first intial) in a word processing program. I used the font New Times Roman in 700 points. The best fonts to use are ones that feature plenty of white space inside the letter.

NOTE: The font used on the (grayed-out) left letter in the image below will not work well because the center part of that A does not have enough white space. Use a font like the one shown in the latter on the right.

Step 2: Use a glue stick to attach the printed letter to your foam board.

Step 3: Using a pencil, make a mark at the center of the top edge of your board. Then, use your hole punch to punch a hole about an inch on either side of the mark.

Step 4: Lay out buttons on top of the letter to find the best fit to cover the letter, while making the inital clear. Use all different sizes of buttons—save your favorite buttons for the top layer.
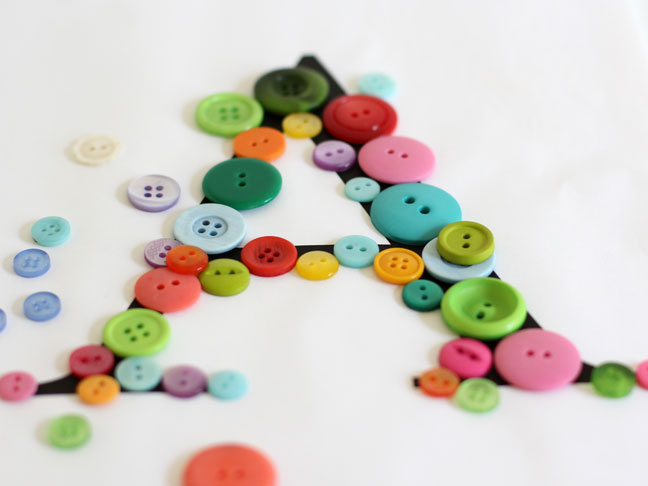
Step 5: Once you like the layout, start gluing the buttons on top of the letter using the white glue.

Step 6: Glue on a second layer of buttons to hide as much of the printed letter as possible.

Step 7: If needed, add more layers of buttons. Use your child’s judgment and tastes. on top of the previous layers
Optional: Use small beads to fill in tight areas. Any excess glue will dry clear.

Step 8: Once the board is dry, tie your ribbon through the holes in the foam board so you can hang it: 1) thread the ends of the ribbon through the back of the holes to the front; 2) tie ends into a knot; 3) trim ends.

Step 9: Hang and enjoy!

Want more Crafts for Kids? Try these:


