Ingredients:
- Wilton Mini Wonder Mold Pan (or another small ball-shaped cake pan)
- 2 cups chocolate icing
- 1 box cake mix, and accompanying ingredients
- 6 ounces (1/2 bag) milk chocolate candy melts
- 3 ounces (1/4 bag) red chocolate candy melts
- 3 ounces (1/4 bag) yellow chocolate candy melts
- 3 ounces (1/4 bag) orange chocolate candy melts
- 4 plastic squeeze bottles or pastry bags
- black food coloring
- decorating spatula
- 11 x 17 inch cardboard cake board
- decorative foil
- tape
- scissors
- Turkey Mini-Cake Pattern
- sheet of wax paper (about 22 inches long)
- toothpick
Preparation:
Step 1: Preheat the oven to 350F.
Step 2: Mix up your cake batter according to the box or recipe directions. Spray the cake pan with flour cooking spray to keep the cakes from sticking once they’re baked.
Step 3: Fill each cavity in the cake pan about 3/4 full of batter. You should get 4 to 6 mini cakes from one cake mix.

Step 4: Bake the cakes according to the directions for cupcakes, usually at about 350F for about 20-22 minutes. When the timer goes off check the mini cakes to see if they’re done (they may take an additional few minutes). The cakes are done when a toothpick inserted into the center comes out clean.
Step 5: When you take the cakes out of the oven, let them cool for a minute or two in the pan. Use a serrated knife to level the tops, then loosen the cakes gently and turn them out onto a cooling rack to finish cooling.

Step 6: While the cakes are cooling wrap a piece of cardboard, with decorator foil, and tape the edges of the wrap to the bottom of the board.

Step 7: Print out 2 copies of the Turkey Mini-Cake Pattern.
Step 8: Place the patterns underneath a large piece of wax paper.

Step 9: Melt the milk chocolate candy melts according to the package directions. Spoon the melted chocolate into a plastic squeeze bottle or into a plastic pastry bag with a very small piece of the tip cut out.
Step 10: Squeeze the melted chocolate gently onto the wax paper to fill in the turkey’s head, repeat the process until you have 4 – 6 brown turkey heads (you need one turkey head for each Turkey Mini Cake you’re making).

Step 11: Take a look at your Turkey Mini-Cake Pattern, on the turkey’s tail look for all of the “Br” sections; use your squeeze bottle to fill each “Br” section with the melted brown milk chocolate candy melts.

Step 12: Working with one color at a time, melt the red, yellow, and orange chocolates candy melts and repeat the process of spooning each clor of meted chocolate into the squeeze bottles (or pastry bags) and filling in the tail sections, using corresponding color for each letter; O= orange, R= red, Y= yellow.

Step 13: When the chocolate on the turkey head’s has hardened, use some of the leftover melted yellow chocolate to make a small beak on each turkey’s head by gently squeezing out a very small amount.
Step 14: Use a small amount of melted red chocolate to add a gobbler on top of and down the side of the turkey’s beak, as shown below:

Step 15: Mix some of the leftover melted chocolate (any color) with a few drops pf black food coloring to make black (or grayish) melted chocolate. If the melted chocolate seizes up, add a little paraffin wax (or use black food coloring made especially for chocolate).
Step 16: Dip the end of your toothpick in the black chocolate and dot two eyes on each turkey head.

Step 17: Cut a sliver off the back and front of the mini cakes. (This will help the chocolate tail and head fit snugger to the turkey’s body.)

Step 18: Add a small dollop of chocolate icing to the cake board where you want each turkey mini cake to sit. This will serve as a glue to help hold the mini-cakes in place.
Step 19: Arrange your mini-cakes on the cakeboard making sure you leace room for the chocolate tails.
Step 20: Ice each mini-cake with chocolate icing.

Step 21: Wipe any excess icing off of the cake board.
Step 22: Add the chocolate tail to the back of the turkey and the head to the front. Press them firmly into the icing to hold them in place.

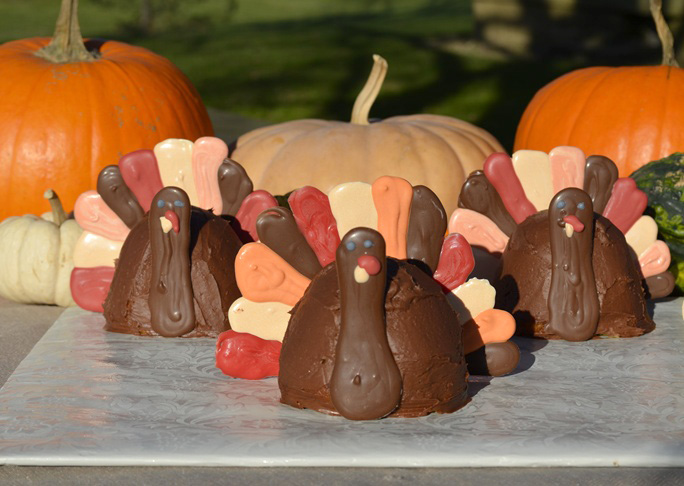
Step 23: Display your mini turkeys on your Thanksgiving dinner table!

Want more Thanksgiving Recipes?
- Cheddar Cornbread Recipe
- Roasted Turkey Recipe
- Salted Caramel Pumpkin Pie Recipe
- Thanksgiving Stuffing Burgers Recipe
- Bagel Stuffing Recipe
- Brussel Sprout Cranberry Slaw Recipe
- Apricot Cranberry Brie Hors D’Oeuvres Recipe
- Root Vegetable Pear Soup Recipe
Linette Gerlach blogs at The Kid’s Fun Review.