
It’s hard not to get excited (and a bit nervous) when your kid experiences a first wiggly tooth. Once the tooth falls out (or is pulled out), the night of the tooth fairy visit is also met with great anticipation (for everyone). Now – it’s best not to get caught off guard. Baby teeth are really damn small and while you think it may be “fun” to reach under your fitful sleeper’s pillow (without waking them up, of course) and replace it with some cash, it’s not easy. Enter the DIY tooth fairy pillow.
I’m a mom of three kids who are all in different teeth-losing stages right now so I need to be prepared. This sweet homemade tooth fairy pillow ensures that teeth are easy to find, plus kids will know just where to look for whatever treasure the tooth fairy has left in its place. Your only challenge? Making sure you have cash on hand the night of the event, and it might help you out to have a few bills smaller than a twenty. Otherwise, you are setting the bar pretty high!
I wish I had made a tooth fairy pillow 3 years ago when my oldest son lost his first tooth. He was afraid of a tooth fairy being in his room, so he hung a tiny bag on the door handle outside his room. Maybe if he had had a cute pillow, he would have been less afraid.
I’m all about quick and easy projects and this DIY tooth fairy pillow is one of those. If you don’t own a sewing machine like me, it’s okay. I hand-sewed the edges, then used a hot glue gun, so it was relatively easy and hassle-free. Here’s how to make your own tooth fairy pillow:
Materials:
- Cotton fabric, less than ½ yard (I got mine from Joann’s)
- Embroidery needle and string
- Hot glue gun and hot glue
- Felt, colors white, pink and black
- Scissors
- Poly-Fil, fiber fill bag
Instructions:

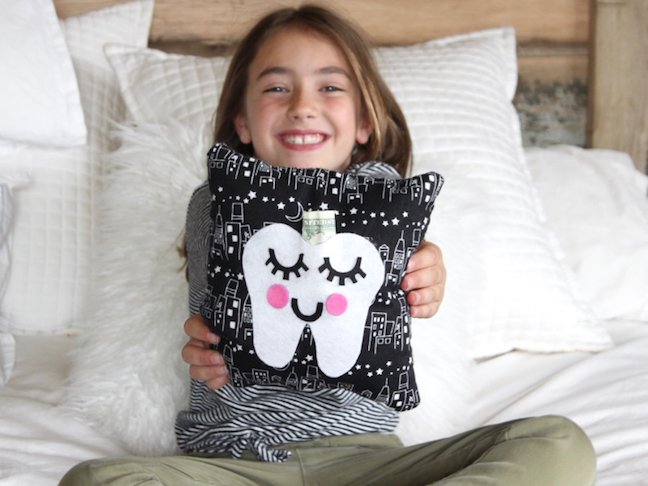
Step 1: Cut the fabric into the shape of a square. I cut the fabric 9 inches x 9 inches. You can choose any cotton fabric you like. I liked the monochromatic effect of the black and white in this fabric, and I like that it’s a night scene, because that’s when the tooth fairy does most of her work.

Step 2: Print a template of the outline of a tooth online, trace it onto a piece of white felt, and cut the felt tooth out.

Step 3: Turn the outside of the fabric (the part you want to see) inwards, so it faces each other. Now, you should have one square with two pieces of fabric, but the fabric looks inside-out.


Step 4: Thread a piece of embroidery string through an embroidery needle. Tie a knot at the end of the string, and insert through the corner of a fabric. Next, begin to push and pull the needle in and out of the thread along the edges of the square. If you have a sewing machine, you can use it. Hand sewing this was really simple for me, and I don’t have extensive sewing experience. If you want to skip sewing enitrely, use strips of Peel N’ Stick tape.


Step 5: Continue step 4 until almost all the sides of the square has stitching. Once you reach the last side, leave a small part of it open to insert the pillow batting. I left about 2 inches unstitched. Now, insert your hand, and grab the inner part of the fabric, and pull the pillow inside out so the correct part of the fabric shows (and it somewhat resembles a pillow).


Step 6: Insert the fiber fill, and spread it out to all edges of the pillow. Once the pillow is stuffed, hand-stitch the remainder of the fabric together.


Step 7: At this point, you can add a small pocket or pouch of any shape with felt. I made a felt tooth (with eyelashes) for some extra cuteness. To make a felt tooth, find a tooth template online and trace it onto a piece of white felt. Next, cut cut two small pink circles, two black eyes with eyelashes and a small smile. Use a hot glue gun to glue the pieces in place on the tooth.


Step 8: Add hot glue to the edges of the tooth, with the exception of the top (it’s important to leave an opening for the tooth, and any money the tooth fairy may bring). Press the tooth in place, and that’s it!


Like what you see? Don’t forget to Pin it!