When fall rolls around, I’m usually found itching to get out my yarn and make something. Anything! I love the versatility of yarn and the ridiculous amounts of ridiculously awesome projects you can make. While I do love yarn, the projects I make are required to be easy. I’m no professional knitter—who is?!? I DO love to knit with my fingers, though. I recently sat down and binge-watched a few of my favorite shows on Netflix so I could hammer out a few finger knit garlands. That’s right, you can make these garlands by using nothing but yarn and your hands! Let’s do this.

Supplies:
- yarn
- scissors
- something to watch while you effortlessly work!
Now, this is as easy as wrapping yarn around your fingers a few times. DO NOT be intimidated by the photos. Just watch closely!

Instructions:
Step 1: Start by placing the tail of the yarn over the back of your hand and weave it between your fingers.
Step 2: With your palm facing you, work the yarn in front of your index finger, behind your middle finger, in front of the ring finger, and behind your pinky finger.
Step 3: Work the yarn back up to your index finger by wrapping it the opposite way of how you wrapped down. Still with me?!

Step 4: Repeat steps 2 & 3. Okay, now your yarn thread should be behind your index finger again. Bring it over to the face of your palm and use your thumb to hold it in place. Forget about it for now.
Step 5: You should have two “loops” on each finger. Starting at the pinky (ALWAYS DO THIS STEP FROM THE BOTTOM UP), pick up the left loop and lift it over the right loop AND over the tip of your pinky finger. Let it go. You’ll be left with one loop on your pinky and finger and two on the rest.

Step 6: Repeat step 5 on all of your other fingers, working from the bottom to the top. When you reach the two loops on your index finger, gently move the actual tail end of your yarn (it’s acting as the left loop) and move it over the right loop and over the tip of your index finger. You can let it go now. And you won’t have to worry about the tail piece of yarn again until you’ve completed your garland and are tying your ends off. We’ll come back to that!

Step 7: Repeat steps 2–6 again and again. As you work, your garland will start to grow. Don’t worry if it seems a little loose/wonky at first! I mean that. It’ll work itself out. Just keep looping and pulling until you’ve reached your desired length of garland. I usually go to something anywhere from three to five feet long.

Step 8: Once you’re ready to “cast off,” you’ll change things up right before you were going to start wrapping a new piece of yarn down and around your fingers. Instead of wrapping to create two loops on each finger, leave every finger with just one loop. Starting at the pinky finger, take that single loop and remove it from your pinky and attach it to your ring finger. Your pinky should be naked at this point.
Step 9: On your ring finger, there will be two loops now. Pull the left loop over the right loop and over the tip of your ring finger. You should have one loop on your ring finger again. Take that single loop and pull it off your ring finger and place it on your middle finger. Repeat the pulling of the left loop over the right and over the tip of your middle finger, and moving up another finger. Do this again with your index finger. Once you have a single loop on the index finger, simply pull it off, cut the yarn a few inches down from the skein, and tie a simple knot. Either trim the excess tail or tuck it into the garland. Do the same for the other end where you originally started. Tie a knot, cut, and tuck! And that’s it!

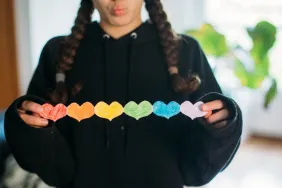
The more you stretch and pull on the garlands, the more they take on that tubular shape! The sides just roll into each other naturally.


Look at all that yarn-y chain goodness!


Hang and drape them around the house! They’re perfect for holiday decor.


Pat yourself on the back for being the ultimate DIYer with this one. Hands only, folks! Bonus: They also make great skinny scarves for kids!
More DIY Knitting Projects: