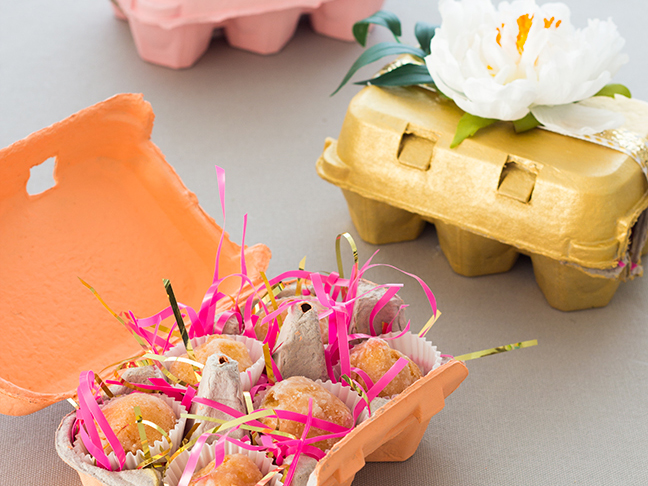

Spring is hands down my favorite time of the year: gardening season is starting, Minnesota is finally starting to thaw, and the spring holidays afford lots of times to surprise friends with quick and easy (but still meaningful) gifts. These gorgeously decorated egg cartons become a present with a wow factor in just a few minutes and open to reveal bite-sized tasty treats of your choosing. I used glazed doughnut bites, but they could easily be substituted for cake truffles, Easter candies, or—if you’re going yeast free for Passover—candied nuts, chocolate-covered marshmallows, or dried fruits. If you are using baked goods, it’s worthwhile to note that many six-count egg cartons have one semi-open side, so you may need to finish assembling the cartons the day you intend to gift them so they don’t become stale.
Not sold yet? Well, even though this baked goods gift box sings “spring,” it’s so perfect for a host of other events, as well. How about Mother’s Day? End of year teacher appreciation? Baby showers or bridal showers? Once you make one yourself, don’t be surprised if you find yourself whipping one (or more!) up for all of these events and then some!

Supplies
- silk floral sprays and single flower stems from Afloral
- green filler sprays from Afloral
- pulp egg cartons with six egg cavities
- acrylic paints in your choice of colors
- paintbrush
- Easter basket grass filler or crinkle shred
- mini cupcake liners
- small treats of your choice
- glue gun and hot glue
- ribbon
- scissors
- wire cutters

Instructions:
Step 1: Open the egg cartons and paint all of the surfaces of the carton in acrylic paint except for the egg cavities, as this portion may come in contact with food. Set aside to dry thoroughly. Do not close until the paint has completely dried to the touch (it should no longer be tacky), otherwise it may stick together and either rip off paint or tear the pulp when you try to open it again.

Step 2: Fill each cavity with a small amount of Easter basket grass filler or crinkle shred. If you use grass filler, you may have to cut it down a little bit to help fit it in the individual cavities.
Step 3: Put a single mini cupcake liner into each cavity, pressing it into the container so that the filler or shred pushes out and around it as pictured. Fill each cavity with the treat of your choice, and then close the carton.
Step 4: Wrap the carton with ribbon (or as I did, with two layers of ribbon), stringing it between the two rows of the egg cavities to keep it in place. Hot glue the overlapping ribbon ends at the top so the ribbon wrap appears seamless, but do not glue the ribbons down to the surface of the egg carton to prevent it from becoming too difficult to open without ripping.

Step 5: Use a wire cutter to clip the stem off of a silk flower head. Cut the stem high enough to the flower so that the flower will lay flat, but not so high up that the plastic backer is cut off, which will cause the flower to fall apart. Cut a small bit of greenery spray off as well, and arrange both pieces on top of the carton until you have a composition you like.
Step 6: Hot glue both pieces down, and then set aside to cool and set. Remove any hot glue strings that may have been left behind, then gift away!
Photos by Maddy Hague of Splendid Supply Co. for Momtastic. Silk flowers provided by Afloral.
More DIY Baked Goods for Spring: